| 要約: | - Camera でシーンを見ることができます。
- Camera で見る領域を定義する必要があります。
- Camera の方向と位置を定義する必要があります。
|
Camera は、3D Scene 空間全体の限定された領域を見る機能を備えています。この領域の全般的なサイズと形状は、以下のプロパティによって定義されます。
field-of-view では、Camera が配置される空間において四角形の底面と頂点を持つピラミッドを定義します。視界では、このピラミッドの頂点を原点として、左右および上下の面の間の角度を指定します。クリッピング面は、オブジェクトが Camera から 近すぎる
または 遠すぎる
ために表示できなくなる Camera からの距離を定義します。
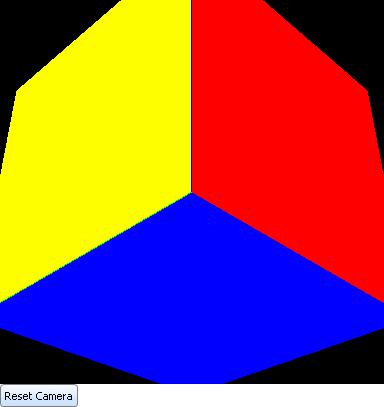
次の例では、立方体を原点の正面から見ています。この例では Camera.field-of-view の既定値である 30 度を初期値として使用しています。field-of-view に異なる値を使用した結果を確認するには、それらが指定されているコード行のコメントを解除してください。
| 例:
field-of-view |
 |
{import * from CURL.GRAPHICS.SCENE}
{import * from CURL.PGUIDE.SCENEUTILS, location = "../../default/support/SceneUtils.scurl"}

{value
    let scene:Scene = {Scene}
    let camera:Camera = scene.camera
    let camera-position:Distance3d = {Distance3d -3ft, -3ft, -3ft}
    let camera-target:Distance3d = {Distance3d 0ft, 0ft, 0ft}
    let camera-direction:Direction3d =
        {(camera-target - camera-position).direction}
    let up:Direction3d = {Direction3d 0, 0, 1}
    {camera.set-orientation-and-position
        camera-direction , up, position = camera-position}
    set camera.projection = Projection.perspective
    set camera.near-clipping-plane = 1ft
    set camera.far-clipping-plane = 20ft
    || Uncomment one of the following three lines
    || to see effect of field-of-view
    ||    set camera.field-of-view = 20degrees
    ||    set camera.field-of-view = 40degrees
    ||    set camera.field-of-view = 80degrees
    {scene.add-object {make-cube 3ft}}
    {scene.add-object {make-axis-object 5ft}}
    let scene-graphic:SceneGraphic =
        {SceneGraphic
            scene,
            width=4in,
            height=4in,
            background = {FillPattern.get-black}
        }
    let reset-camera:CommandButton =
        {CommandButton
            label = "Reset Camera",
            {on Action at b:CommandButton do
                let camera-position:Distance3d = {Distance3d -3ft, -3ft, -3ft}
                let camera-direction:Direction3d =
                    {(camera-target - camera-position).direction}
                {camera.set-orientation-and-position
                    camera-direction , up, position = camera-position}
                {scene-graphic.update-drawable}
            }
        }
    {VBox
        scene-graphic,
        reset-camera
    }
}
| |
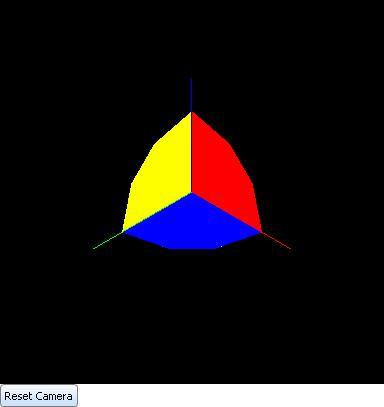
far-clipping-plane に小さな値を設定してモデルを回転すると、クリッピング面のプロパティの効果を確認することができます。モデルの各部分が far-clipping-plane を超えたときにとどのようにして見えなくなるかに注意してください。
| 例:
far-clipping-plane |
 |
{import * from CURL.GRAPHICS.SCENE}
{import * from CURL.PGUIDE.SCENEUTILS, location = "../../default/support/SceneUtils.scurl"}

{value
    let scene:Scene = {Scene}
    let camera:Camera = scene.camera
    let camera-position:Distance3d = {Distance3d -3ft, -3ft, -3ft}
    let camera-target:Distance3d = {Distance3d 0ft, 0ft, 0ft}
    let camera-direction:Direction3d =
        {(camera-target - camera-position).direction}
    let up:Direction3d = {Direction3d 0, 0, 1}
    {camera.set-orientation-and-position
        camera-direction , up, position = camera-position}

    set camera.projection = Projection.perspective
    set camera.near-clipping-plane = 1ft
    set camera.far-clipping-plane = 20ft
    set camera.field-of-view = 80degrees
    set camera.far-clipping-plane = 8ft
    {scene.add-object {make-cube 3ft}}
    {scene.add-object {make-axis-object 5ft}}
    let scene-graphic:SceneGraphic =
        {SceneGraphic
            scene,
            width=4in,
            height=4in,
            background = {FillPattern.get-black}
        }
    let reset-camera:CommandButton =
        {CommandButton
            label = "Reset Camera",
            {on Action at b:CommandButton do
                let camera-position:Distance3d = {Distance3d -3ft, -3ft, -3ft}
                let camera-direction:Direction3d =
                    {(camera-target - camera-position).direction}
                {camera.set-orientation-and-position
                    camera-direction , up, position = camera-position}
                {scene-graphic.update-drawable}
            }
        }
    {VBox
        scene-graphic,
        reset-camera
    }
}
| |
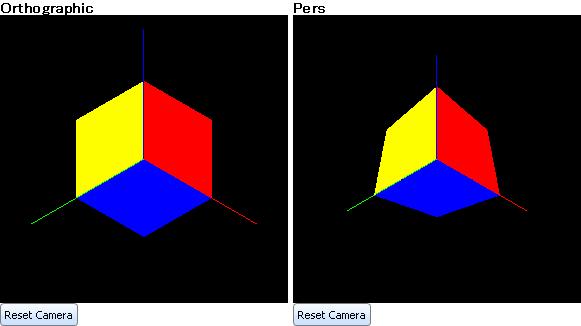
Camera.projection の値が perspective の場合、Camera は視界プロパティで定義されるピラミッドとクリッピング面の境界間にあるすべてのオブジェクトを見ることができます。
Camera.projection の値が orthographic の場合、Camera は、近くにあるクリッピング面が視界のピラミッドと交差する位置の四角形と、遠くにあるクリッピング面により定義される四角形の立方体内にあるすべてのオブジェクトを見ることができます。
次の例では透視投影と正投影法を示しています。field-of-view に異なる値を使用した結果を表示するには、それらが設定されている行のコメントを解除してください。
| 例:
正投影法と透視投影 |
 |
{import * from CURL.GRAPHICS.SCENE}
{import * from CURL.PGUIDE.SCENEUTILS, location = "../../default/support/SceneUtils.scurl"}

{value
    ||Scene with orthographic projection
    let scene-ortho:ExampleScene = {ExampleScene}
    let camera-ortho:Camera = scene-ortho.camera
    set scene-ortho.camera-position = {Distance3d -3ft, -3ft, -3ft}
    {scene-ortho.camera-setup}
    set camera-ortho.projection = Projection.orthographic
    set camera-ortho.near-clipping-plane = 1ft set
    camera-ortho.far-clipping-plane = 20ft
    set camera-ortho.field-of-view = 155degrees
    {scene-ortho.add-object {make-cube 3ft}}
    {scene-ortho.add-object {make-axis-object 5ft}}
    let scene-graphic-ortho:SceneGraphic =
        {SceneGraphic
            scene-ortho,
            width=3in,
            height=3in,
            background = {FillPattern.get-black}
        }
    ||Scene with perspective projection
    let scene-pers:ExampleScene = {ExampleScene}
    let camera-pers:Camera = scene-pers.camera
    set scene-pers.camera-position = {Distance3d -3ft, -3ft, -3ft}
    {scene-pers.camera-setup}
    set camera-pers.projection = Projection.perspective
    set camera-pers.near-clipping-plane = 1ft
    set camera-pers.far-clipping-plane = 20ft
    set camera-pers.field-of-view = 70degrees
    {scene-pers.add-object {make-cube 3ft}}
    {scene-pers.add-object {make-axis-object 5ft}}
    let scene-graphic-pers:SceneGraphic =
        {SceneGraphic
            scene-pers,
            width=3in,
            height=3in,
            background = {FillPattern.get-black}
        }

    let reset-camera-ortho:CommandButton =
        {CommandButton
            label = "Reset Camera",
            {on Action at b:CommandButton do
                set scene-ortho.camera-position = {Distance3d -3ft, -3ft, -3ft}
                {scene-ortho.camera-setup}
                set camera-ortho.projection = Projection.orthographic
                set camera-ortho.near-clipping-plane = 1ft set
                camera-ortho.far-clipping-plane = 20ft
                set camera-ortho.field-of-view = 155degrees
                {scene-graphic-ortho.update-drawable}
            }
        }
    let reset-camera-pers:CommandButton =
        {CommandButton
            label = "Reset Camera",
            {on Action at b:CommandButton do
                set scene-pers.camera-position = {Distance3d -3ft, -3ft, -3ft}
                {scene-pers.camera-setup}
                set camera-pers.projection = Projection.perspective
                set camera-pers.near-clipping-plane = 1ft
                set camera-pers.far-clipping-plane = 20ft
                set camera-pers.field-of-view = 70degrees
                {scene-graphic-pers.update-drawable}
            }
        }
    {spaced-hbox
        {VBox
            {text font-weight="bold", Orthographic},
            scene-graphic-ortho,
            reset-camera-ortho
        },
        {VBox
            {text font-weight="bold", Pers},
            scene-graphic-pers,
            reset-camera-pers
        }
    }
} | |
Camera が見ている方向は 3D ベクトルとして表されます。通常は Camera の置かれている場所からシーンで関心のあるポイントに方向を設定します。1 つの設定方法として、Camera の対象ポイントから Camera の位置を差し引きます。次の例ではこのアプローチを使用します。該当するコードは次のとおりです。
let camera-target:Distance3d = {Distance3d 0ft, 0ft, 0ft}
let camera-position:Distance3d = {Distance3d 5ft, -3ft, 5ft}
let camera-direction:Direction3d =
    {(camera-target - camera-position).direction}
変数 camera-target では、Camera が見るポイント (ここでは原点) を定義します。変数 camera-position は、Camera の位置を定義します。この例では、原点より右へ 5 フィート (x = 5ft)、上へ 5 フィート (z = 5ft)、前方へ 3 フィート (y = -3ft) のポイントを指定します。変数 camera-direction は、これら 2 つのポイントから計算されます。camera-position の値を変えて、モデルの表示がどのように変わるか試してみてください。
| 例:
カメラの位置 |
 |
{import * from CURL.GRAPHICS.SCENE}
{import * from CURL.PGUIDE.SCENEUTILS,
    location = "../../default/support/SceneUtils.scurl"}

{value
    let scene:Scene = {Scene}
    let camera:Camera = scene.camera
    || Above and in front
    let camera-position:Distance3d = {Distance3d 5ft, -3ft, 5ft}
    || Below and in front
    ||    let camera-position:Distance3d = {Distance3d 5ft, -3ft, -5ft}
    let camera-target:Distance3d = {Distance3d 0ft, 0ft, 0ft}
    let camera-direction:Direction3d =
        {(camera-target - camera-position).direction}
    let up:Direction3d = {Direction3d 0, 0, 1}
    {camera.set-orientation-and-position
        camera-direction , up, position = camera-position}

    set camera.projection = Projection.perspective
    set camera.near-clipping-plane = 1ft
    set camera.far-clipping-plane = 20ft
    set camera.field-of-view = 90degrees
    {scene.add-object {make-polygon-set 3ft}}
    {scene.add-object {make-axis-object 5ft}}
    {SceneGraphic
        scene,
        width=4in,
        height=4in,
        background = {FillPattern.get-black}
    }
}
| |
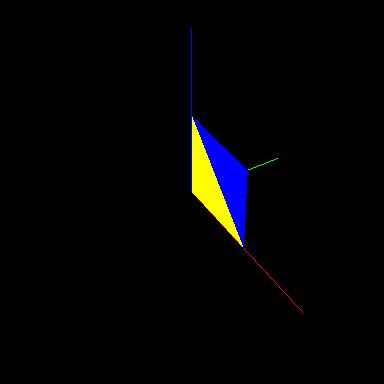
実際のカメラで撮影するときは、写真の長い方が上になるように、または短い方が上になるようにカメラの持ち方を変えてみるものです。同様に、プロパティ
Camera.up-vector はシーンのどの部分が
SceneGraphic の上に指しているかを決定し、ディスプレイ画面の上部に表示します。次の例では、変数
up は最初に
{Direction3d 0, 0, 1} に設定されます。この変数は、
camera-position および
camera-direction とともに
Camera.set-orientation-and-position に渡され、
Camera を拘束します。結果のディスプレイでは、z 軸 (青い線) がディスプレイの上を指しています。この例では、コードのコメント行で
up に異なる値を設定しています。これらの値のいずれかを使用して、
up-vector の効果を確認してください。次を確認してください。
- up が {Direction3d 0, 0, 1} の場合、正の z 軸 (青) が上を指します。
- up が {Direction3d 0, 1, 0} の場合、正の y 軸 (緑) が上を指します。
- up が {Direction3d 1, 0, 0} の場合、正の x 軸 (赤) が上を指します。
- up が {Direction3d 0, 1, 1} の場合、正の y 軸と z 軸に対して 45 度の角度にある架空の線が上を指します。
SceneGraphic によって提供される既定のマウス イベント処理は、Camera の方向を {Distance3d 0, 0, 1} に設定します。したがって、軸を作成する PolygonSet を移動するとその方向は既定に戻ります。
| 例:
up-vector |
 |
{import * from CURL.GRAPHICS.SCENE}
{import * from CURL.PGUIDE.SCENEUTILS, location = "../../default/support/SceneUtils.scurl"}

{value
    let scene:Scene = {Scene}
    let camera:Camera = scene.camera
    let camera-position:Distance3d = {Distance3d 5ft, -3ft, 5ft}
    let camera-target:Distance3d = {Distance3d 0ft, 0ft, 0ft}
    let camera-direction:Direction3d =
        {(camera-target - camera-position).direction}
|| positive z axis is up
    let up:Direction3d = {Direction3d 0, 0, 1}
|| positive y axis is up
||    let up:Direction3d = {Direction3d 0, 1, 0}
|| positive x axis is up
||    let up:Direction3d = {Direction3d 1, 0, 0}
|| line at a 45 degree angle to the y and z axes is up
||    let up:Direction3d = {Direction3d 0, 1, 1}
    {camera.set-orientation-and-position
        camera-direction , up, position = camera-position}

    set camera.projection = Projection.perspective
    set camera.near-clipping-plane = 1ft
    set camera.far-clipping-plane = 20ft
    set camera.field-of-view = 90degrees
    {scene.add-object {make-polygon-set 3ft}}
    {scene.add-object {make-axis-object 5ft}}
    {SceneGraphic
        scene,
        width=4in,
        height=4in,
        background = {FillPattern.get-black}
    }
} | |
Copyright © 1998-2019 SCSK Corporation.
All rights reserved.
Curl, the Curl logo, Surge, and the Surge logo are trademarks of SCSK Corporation.
that are registered in the United States. Surge
Lab, the Surge Lab logo, and the Surge Lab Visual Layout Editor (VLE)
logo are trademarks of SCSK Corporation.