{import * from CURL.GRAPHICS.RENDERER3D}
|| Define a class SpinCube that "has a" Renderer3dGraphic
{define-class public SpinCube {inherits BaseFrame}
field left-top-back-vertex:Distance3d = {Distance3d -1in, 1in, -1in}
field right-top-back-vertex:Distance3d = {Distance3d 1in, 1in, -1in}
field right-top-front-vertex:Distance3d = {Distance3d 1in, 1in, 1in}
field left-top-front-vertex:Distance3d = {Distance3d -1in, 1in, 1in}
field left-bottom-back-vertex:Distance3d = {Distance3d -1in, -1in, -1in}
field right-bottom-back-vertex:Distance3d = {Distance3d 1in, -1in, -1in}
field right-bottom-front-vertex:Distance3d = {Distance3d 1in, -1in, 1in}
field left-bottom-front-vertex:Distance3d = {Distance3d -1in, -1in, 1in}
field cube-angle:Angle = 0deg
field _alpha:Fraction = 1.0
field _face:Texture
field rg:Renderer3dGraphic
field public _timer:Timer
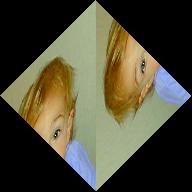
{constructor public {default face:FillPattern={url "../../default/images/generic.gif"}, ...}
set self._face = {face.to-Texture}
set self.rg =
{Renderer3dGraphic
repaint-handler=
{proc {rg:Renderer3dGraphic,
ren:Renderer3d,
area:#RectangleSet
}:void
{self.redraw-proc ren}
}, ...}
{self.add-internal self.rg}
{construct-super ...}
set self._timer =
{self.rg.animate
frequency=30fps,
repeat = 0,
{on TimerEvent do
{self.rg.update-drawable}
}
}
}
{method {draw-quad
renderer:Renderer3d,
vertex-0:Distance3d,
vertex-1:Distance3d,
vertex-2:Distance3d,
vertex-3:Distance3d,
color-0:Fraction3d,
alpha:double
}:void
|| Clamp the alpha channel to zero (fully transparent) if the
|| given parameter is less than zero.
{if alpha < 0.0 then set alpha = 0.0}
|| Add 4 vertices
{render-primitive
p:Primitive,
type=Primitive.quads
on renderer do
{p.color4 color-0.x, color-0.y, color-0.z, alpha}
{p.texture-coord2 0, 1}
{p.vertex3v vertex-3}
{p.texture-coord2 1, 1}
{p.vertex3v vertex-2}
{p.texture-coord2 1, 0}
{p.vertex3v vertex-1}
{p.texture-coord2 0, 0}
{p.vertex3v vertex-0}
}
}
{method {redraw-proc renderer:Renderer3d}:void
|| Clear window graphic with background color
{renderer.clear color={Color.from-rgb 0.8, 0.8, 0.8}}
|| uncomment the next line to see 'inside' the cube
|| set renderer.cull-face = Cull.front
set renderer.cull-face-enabled? = true
|| The following calls enable transparency (alpha blending)
set renderer.blend-enabled? = true
set renderer.blend-src-function = Blend.src-alpha
set renderer.blend-dst-function = Blend.one-minus-src-alpha
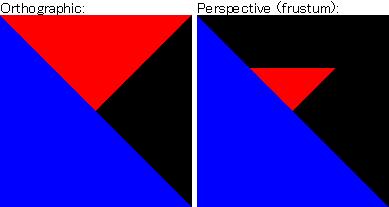
|| Render in perspective
{renderer.projection-matrix.frustum
-0.5in, 0.5in, || left, right
-0.5in, 0.5in, || bottom, top
|| "near" and "far" are distances from the eye position (for frustum)
1in, 10in
}
{renderer.modelview-matrix.load-identity}
|| This moves the model away from the eye position (which is 0, 0, 0)
{renderer.modelview-matrix.translate 0in, 0in, -5in}
|| This rotates the whole cube along the y-axis by cube-angle
{renderer.modelview-matrix.rotate {Direction3d 0, 1, 0}, self.cube-angle}
|| This rotates the whole cube along the z-axis by 30deg
{renderer.modelview-matrix.rotate {Direction3d 0, 0, 1}, -45deg}
|| Sets the texture to use.
set renderer.texture = self._face
|| Draw the front face of the cube, blended with a white background.
{self.draw-quad
renderer,
self.left-bottom-front-vertex,
self.left-top-front-vertex,
self.right-top-front-vertex,
self.right-bottom-front-vertex,
{Fraction3d 1, 1, 1},
self._alpha
}
|| Draw the back face of the cube, blended with a yellow background.
{self.draw-quad
renderer,
self.left-top-back-vertex,
self.left-bottom-back-vertex,
self.right-bottom-back-vertex,
self.right-top-back-vertex,
{Fraction3d 1, 1, 0},
self._alpha
}
|| Draw the bottom face of the cube, blended with a red background.
{self.draw-quad
renderer,
self.left-bottom-back-vertex,
self.left-bottom-front-vertex,
self.right-bottom-front-vertex,
self.right-bottom-back-vertex,
{Fraction3d 1, 0, 0},
self._alpha
}
|| Draw the top face of the cube, blended with a green background.
{self.draw-quad
renderer,
self.left-top-front-vertex,
self.left-top-back-vertex,
self.right-top-back-vertex,
self.right-top-front-vertex,
{Fraction3d 0, 1, 0},
self._alpha
}
|| Draw the right face of the cube, blended with a blue background.
{self.draw-quad
renderer,
self.right-bottom-back-vertex,
self.right-bottom-front-vertex,
self.right-top-front-vertex,
self.right-top-back-vertex,
{Fraction3d 0, 0, 1},
self._alpha
}
|| Draw the left face of the cube, blended with a purple background.
{self.draw-quad
renderer,
self.left-bottom-front-vertex,
self.left-bottom-back-vertex,
self.left-top-back-vertex,
self.left-top-front-vertex,
{Fraction3d 1, 0, 1},
self._alpha
}
|| Increment the angle by 1 deg so that the cube spins
{if self.cube-angle >= 0deg then
{inc self.cube-angle, 1deg}
else
{dec self.cube-angle, 1deg}
}
}
}
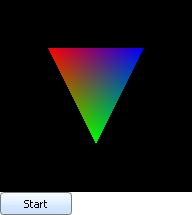
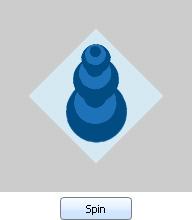
{value
let my-cube:SpinCube = {SpinCube}
let switch:CommandButton =
{CommandButton
label="Spin",
width=0.75in,
{on Action do
{if my-cube._timer.repeat == 0 then
set my-cube._timer.repeat = -1
set switch.label = "Stop"
else
set my-cube._timer.repeat = 0
set switch.label = "Spin"
}
}
}
{spaced-vbox halign="center", my-cube,
{HBox {Fill}, switch, {Fill}}
}
}
| |