「逆引きリファレンス」カテゴリーアーカイブ

Domainを使ったバリデーション機能の拡張

複雑な入力チェックを実装したい場合、ドメインをカスタマイズすることにより簡単に入力チェックを実装することが出来ます。

まずは下記のサンプルソースをご覧ください。このサンプルでは、StandardIntDomainを拡張して最小値、最大値、許容値チェックを実装しています。

{curl 6.0 applet}
{curl-file-attributes character-encoding = “shift-jis”}

|| ///////////////////////////////////////////////////////////////
|| カスタマイズしてvalidateのメッセージを変更したint型のドメイン
|| ///////////////////////////////////////////////////////////////

{define-class public CustomIntDomain {inherits StandardIntDomain}

  {constructor public {default
                          default-value:any = 0,
                          min-allowable:any = null,
                          max-allowable:any = null,
                          allowable-values:#{Array-of int} = null
                      }

    {construct-super
        default-value = default-value,
        min-allowable = min-allowable,
        max-allowable = max-allowable,
        allowable-values = allowable-values
    }
   
  }

  || /////////////////////////////////////////////////
  || メッセージ変更のためメソッドを拡張します。
  || /////////////////////////////////////////////////
  {method public {validate x:any}:#ValidationException

    ||最小値チェック(min-allowableが指定されていない場合は無視)
    {if-non-null min-val:any = self.min-allowable
     then
        let min:int = min-val asa int

        {if min > x asa int
         then
            ||最小値エラーの場合はValidationExceptionを返却
            {return
                {ValidationException
                    {format “%d未満の値を指定することは出来ません。”,min}
                }
            }
        }
    }

    ||最大値チェック(max-allowableが指定されていない場合は無視)
    {if-non-null max-val:any = self.max-allowable
     then
        let max:int = max-val asa int

        {if max < x asa int
         then
            ||最大値エラーの場合はValidationExceptionを返却
            {return
                {ValidationException
                    {format “%dよりも上の値を指定することは出来ません。”,max}
                }
            }
        }
    }

    ||範囲チェック(allowable-valuesが指定されていない場合は無視)
    {if-non-null data-sets:{Set-of any} = self.unsorted-allowable-values
     then
        {if not {data-sets.member? x}
         then
            ||範囲エラーの場合はValidationExceptionを返却
            {return
                {ValidationException
                    {format “%sは指定不可能な値です。”,x}
                }
            }
        }
    }

    {return {super.validate x}}    ||値が許容される場合はスーパークラスに処理を任せる

  }
}

||ドメインの定義
{let domain-for-validate:Domain =
    {CustomIntDomain
        min-allowable = 0,||最小値
        max-allowable = 100,||最大値
        allowable-values = {{Array-of int} 0,1,5,10,50}||指定可能な範囲値
    }
}

{let md1:MessageDisplay = {MessageDisplay}}

{TextField
    message-display = md1,
    {validate-with
        ||DomainValidatorにて使用するドメインを指定
        {DomainValidator domain-for-validate}
    }
}

{value md1}

このサンプルを実行すると、-1以下の値を入力した場合、100以上の値を入力した場合、allowable-valuesに含まれない値を入力した場合でそれぞれ異なるエラーメッセージが表示されます。
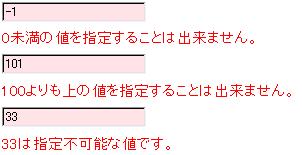
 int-validation.jpg

RecordGridのセルフォーカスをEnterキーで移動する

RecordGridのセルフォーカスをEnterキーで移動するにはRecordGridCellのカスタマイズが必要です。

以下のサンプルソースをご覧ください。


{curl 6.0 applet}
{curl-file-attributes character-encoding = “shift-jis”}

{define-class public EnterKeyCell {inherits StandardStringCell}

  {constructor public {default}
    {construct-super}
  }

  {method public {create-editor}:TextField
    let editor:TextField = {super.create-editor}

    ||セル上で操作するテキストフィールドに対して、
    ||Enterキーのイベントを追加する。
   
{editor.add-event-handler
        {on e:KeyPress at tf:TextField do
            {if e.value == KeyPressValue.enter
             then
                {self.grid.ui.traverse forward? = not e.shift?}
                   
            }
        }
    }

    {return editor}
   
  }
}

{let people:RecordSet =
    {RecordSet
        {RecordFields
            {RecordField “First”, domain = String},
            {RecordField “Last”, domain = String},
            {RecordField “Age”, domain = int}
        },
        {RecordData First = “John”, Last = “Smith”, Age = 25},
        {RecordData First = “Jane”, Last = “Smith”, Age = 29},
        {RecordData First = “Jane”, Last = “Jones”, Age = 28}
    }
}
{value
    {RecordGrid
        record-source = people,
        height = 3cm,
        cell-spec = EnterKeyCell
    }
}

 このサンプルを実行すると、以下のような実行結果が得られます。

サンプルでEnterキーを押下すると、グリッド上のセルフォーカスが移動します。

 enter.jpg


RecordViewを用いたデータのソート・抽出

 RecordView は、基になるソース RecordSet に含まれているデータに効率よくアクセスするための基本的な手段です。

RecordViewを使用することで、フィルタリングで抽出したデータだけを照会することが出来ます。
例えば画面表示を行う前に、RecordViewデータに対して
アプリケーションロジックを適用してデータのソートを行ったり、
フィルタリングを実施することが出来ます。
RecordViewを用いて特定のデータを抽出したからといって、
元のRecordSetに登録されているデータが無くなるわけではありません。

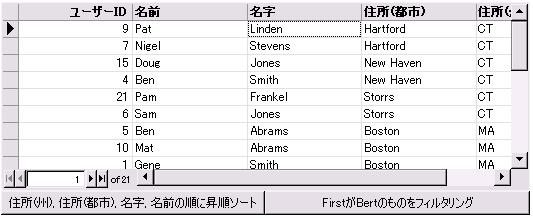
RecordViewのサンプルコードは以下の通りです。

{curl 6.0 applet}
{curl-file-attributes character-encoding = “shift-jis”}

{let staff:RecordSet =
    {RecordSet
        {RecordFields
            {RecordField
                “id”, caption = “ユーザーID”, domain = int,
                index-type = RecordFieldIndexType.unique
            },
            {RecordField “First”, domain = String, caption = “名前”},
            {RecordField “Last”, domain = String , caption = “名字”},
            {RecordField “City”, domain = String , caption = “住所(都市)”},
            {RecordField “State”, domain = String, caption = “住所(州)”}
        },
        {RecordData id = 1, First = “Gene”, Last = “Smith”, City = “Boston”, State = “MA”},
        {RecordData id = 2, First = “Fred”, Last = “Smith”, City = “Cambridge”, State = “MA”},
        {RecordData id = 3, First = “Mike”, Last = “Smith”, City = “Keene”, State = “NH”},
        {RecordData id = 4, First = “Ben”, Last = “Smith”, City = “New Haven”, State = “CT”},
        {RecordData id = 5, First = “Ben”, Last = “Abrams”, City = “Boston”, State = “MA”},
        {RecordData id = 6, First = “Sam”, Last = “Jones”, City = “Storrs”, State = “CT”},
        {RecordData id = 7, First = “Nigel”, Last = “Stevens”, City = “Hartford”, State = “CT”},
        {RecordData id = 8, First = “Bert”, Last = “Stevens”, City = “Cambridge”, State = “MA”},
        {RecordData id = 9, First = “Pat”, Last = “Linden”, City = “Hartford”, State = “CT”},
        {RecordData id = 10, First = “Mat”, Last = “Abrams”, City = “Boston”, State = “MA”},
        {RecordData id = 11, First = “John”, Last = “Rogers”, City = “Cambridge”, State = “MA”},
        {RecordData id = 12, First = “Dan”, Last = “Abrams”, City = “Keene”, State = “NH”},
        {RecordData id = 13, First = “Chris”, Last = “Abrams”, City = “Cambridge”, State = “MA”},
        {RecordData id = 14, First = “Glenn”, Last = “Abrams”, City = “Keene”, State = “NH”},
        {RecordData id = 15, First = “Doug”, Last = “Jones”, City = “New Haven”, State = “CT”},
        {RecordData id = 16, First = “Susan”, Last = “Rogers”, City = “Concord”, State = “NH”},
        {RecordData id = 17, First = “Joan”, Last = “Smith”, City = “Concord”, State = “MA”},
        {RecordData id = 18, First = “Tom”, Last = “Frankel”, City = “Keene”, State = “NH”},
        {RecordData id = 19, First = “Sarah”, Last = “Frankel”, City = “Concord”, State = “NH”},
        {RecordData id = 20, First = “John”, Last = “Jones”, City = “Keene”, State = “NH”},
        {RecordData id = 21, First = “Pam”, Last = “Frankel”, City = “Storrs”, State = “CT”}
    }
}
{let rv:RecordView =
    {RecordView staff}
}
{let rg:RecordGrid =
    {RecordGrid
        record-source = rv, height = 5cm, width = 14cm
    }
}
{value
    {VBox
        rg,
        {HBox
            {CommandButton
                width = {make-elastic},
                label = “住所(州), 住所(都市), 名字, 名前の順に昇順ソート”,
                {on Action do
                    set rv.sort = “State, City, Last, First”
                }
            },
            {CommandButton
                width = {make-elastic},
                label = “FirstがBertのものをフィルタリング”,
                {on Action do
                    set rv.filter = {RecordData First = “Bert”}
                }
            }
        }
    }       
}

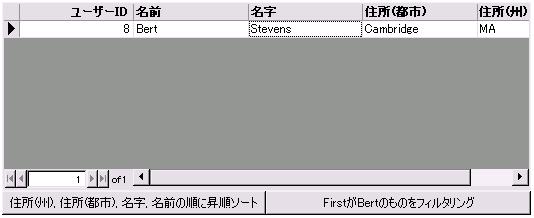
このサンプルを実行すると以下のような結果が得られます。

左のボタンをクリックしたとき

record-view_1.jpg


右のボタンをクリックしたとき

record-view_2.jpg


ただし、RecordViewを作成したからといって、
RecordSetに含まれる各レコードが個別にコピーされた訳ではありません。
RecordViewで抽出したレコードに格納されている値を直接書き換えてしまうと、
RecordSetに登録されている値も変更されてしまうので、注意が必要です。

また、レコードのステータスを更新するRecordViewの以下のメソッドは、
元のRecordSetの更新状態を基準に処理を実行します。
そのため、RecordSet側でデータが更新されていた場合は、
RecordViewの方でデータの更新を行っていなくとも
現在抽出している全てのレコードに変更が生じる場合があるため、利用時に注意が必要です。

  ○RecordView.commit
  ○RecordView.revert
  ○RecordView.load
  ○RecordView.load-state
  ○RecordView.pending-update?

RecordGridのセルに色をつける

RecordGridで任意のセルに色をつけたい場合は、RecordGridCellをカスタマイズする必要があります。

ここでは、データを更新したセルに色をつける実装方法について紹介します。

サンプルソース

{define-class public ColorCell {inherits StandardStringCell}

  {constructor public {default}
    {construct-super}
  }

  ||セルの色を制御するにはrefresh-dataメソッドを
  ||オーバーライドします。

  {method public {refresh-data}:void

    ||スーパークラスのメソッドを呼び出します。
    {super.refresh-data}

    {if-non-null record:Record = self.record
     then
        ||当該セルのデータが更新された場合に、
        ||背景色を設定します。
        {if {record.field-pending-update? self.column.field-name}
         then
            set self.background = “pink”
        }
    }
   
  }

 
}

{let people:RecordSet =
    {RecordSet
        {RecordFields
            {RecordField “First”, domain = String},
            {RecordField “Last”, domain = String},
            {RecordField “Age”, domain = int}
        },
        {RecordData First = “John”, Last = “Smith”, Age = 25},
        {RecordData First = “Jane”, Last = “Smith”, Age = 29},
        {RecordData First = “Jane”, Last = “Jones”, Age = 28}
    }
}

||データを更新します。
{do
    let r:Record = {non-null {people.select-one}}

    {r.set “Last”,”Update”}
}

{value
    {RecordGrid
        record-source = people,
        height = 3cm,
        ||cell-specで上記で作成したセルを指定します。
        cell-spec = ColorCell
    }
}

これを実行すると、以下のような結果が表示されます。データを編集すると、編集したセルの色がピンクになります。

colorcell.jpg


RecordGridのformat-specの使用法

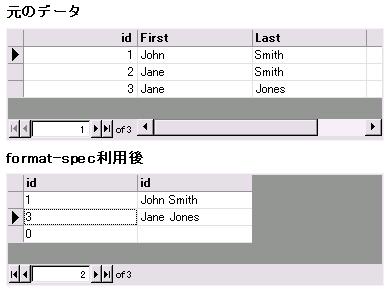
RecordGrid.format-specはグリッド上における値の表示方法を制御するためのプロシージャです。format-specを利用することで、簡単にマスタデータの参照が行えるようになります。 

サンプルコード:

||参照する元のデータを取得します。
{let people:RecordSet =
    {RecordSet
        {RecordFields
            {RecordField “id”,domain = int},||データを一意にするIDを付加します。
            {RecordField “First”, domain = String},
            {RecordField “Last”, domain = String},
            {RecordField “Age”, domain = int}
        },
        {RecordData id = 1,First = “John”, Last = “Smith”, Age = 25},
        {RecordData id = 2,First = “Jane”, Last = “Smith”, Age = 29},
        {RecordData id = 3,First = “Jane”, Last = “Jones”, Age = 28}
    }
}

||値を入力する枠を作成します。
{let list:RecordSet =
    {RecordSet
        {RecordFields
            {RecordField “id”,domain = int}
        },
        {RecordData},
        {RecordData},
        {RecordData}
       
    }
}

{bold 元のデータ}

{RecordGrid
    record-source = people,
    height = 3cm
}

{bold format-spec利用後}

{value
    {RecordGrid
        record-source = list,
        height = 3cm,
        automatic-columns? = false,
        {RecordGridColumn “id”},
        {RecordGridColumn
            “id”,
            ||cells-take-focus?を指定して
            ||直接編集できないようにします。
            cells-take-focus? = false,
            ||format-specを利用して表示するデータを取得します。
            format-spec =
                {proc {val:any}:String
                    ||
                    let r:#Record =
                        {people.select-one
                            filter = {RecordData id = val}
                        }
                   
                    {return
                        {if-non-null r
                         then
                            ||peopleにデータが存在した場合はデータを表示します。
                            {String r[“First”] , ” ” , r[“Last”]}
                         else
                            ||存在しなかった場合は空の文字列を返します。
                            “”
                        }
                    }
                }
        }
    }
}


このコードを実行し、下のグリッドにidを入力すると、変数peopleに登録されているFirstとLastの値が2列目に表示されます。

実行結果

 format-spec.jpg


アプレット終了時の処理


アプレット終了時もしくは一時停止時になんからの処理を行いたい場合、register-exit-proc(終了時)もしくはregister-suspend-proc(一時停止時)というプロシージャを利用します。

このプロシージャは、終了時に実行させたい処理(プロシージャ)を登録することができます。アプレット終了時に複数の処理が登録されている場合は、登録時とは逆の順番で実行されます。

以下はサンプルです。

{curl 6.0 applet}

{value
    def p =
        {proc {}:void
            {output “終了!”}        
        }
    {register-exit-proc p}
   
    {HBox background = “red”}
}

実行し、×ボタンなどで終了させますと、コンソールに”終了!”という文字が表示され、終了します。

逆に登録したものを削除する場合は、unregister-exit-procもしくはunregister-suspend-procプロシージャを利用します。

APIリファレンス


Curlランタイムの起動と停止

surge-doというコマンドで、Curlのラインタイムの起動や停止などいろいろ操作することができます。そこでsurge-doコマンドのオプションの一部を紹介したいと思います。

Curlランタイム起動

> surge-do --start

Curlランタイムの停止

> surge-do --quit

Curlランタイムの強制終了

> surge-do --quit-force

コントロールパネルの表示

> surge-do --show-manager

コンソールにデータ出力(以下の例ではコンソールにABCと出力されます。)

> surge-do --output ABC

ブラウザの起動及びサイト表示

> surge-do --browse http://www.curlap.com

ブラウザの起動及びサイト表示 (新しいブラウザ)

> surge-do --browse-new http://www.curlap.com


Curl Advanced UI 概要

Curl Advanced UIは、オープンソースで提供されるCurl標準コントロールを拡張したユーザビリティ向上のためのUI部品群です。当部品のライセンスはApache License2.0で提供されるため、商用でも非商用でも自由に利用でき、またカスタマイズして利用することもできます。また、当オープンソースプロジェクトにも参加していただき、おもしろいライブラリを追加していただけると幸いです。

SourceForgeからダウンロードできます。また、動画もSourceForge Wikiから見ることができます。

コントロール部品

・アニメーションボタン          アニメーション効果を持ったボタン
・オシレーティングボタン             同様にアニメーション効果を持ったボタン
・キーマッピング・コマンドボタン      ファンクションキーなどのキー操作とボタンの連動
・電卓テキストフィールド             電卓機能を持った入力フィールド
・ドリルダウン・リストボックス         ドリルダウンのできるリストボックス
・ドリルダウン・コンボボックス        ドリルダウンのできるコンボボックス
・バリデーションチェックフィールド   バリデーションチェック機能を持った入力フィールド
・FromTo日付フィールド           FromとToを指定できる入力フィールド
・ガイドプロンプト                     入力ガイドを表示できる入力フィールド
・オートコンプリート                  オートコンプリート機能を持った入力フィールド
・オートフォーマット                  入力フォーマットを自動変換するフィールド
・One-clickファイル選択テキストフィールド  クリックと同時にファイル選択ボックスが表示される
・ズームテキストフィールド          入力時、フィールドが大きくなり文字が見やすくなる

コンテナ部品

・キューブフレーム                   3Dを用いたキューブ形のフレーム
・フィッシュアイ・メニュー             MacのDockのようなメニュー
・カルーセル・メニュー                ぐるぐる回るカルーセル・メニュー
・ポップアップ画像ビューア      LightBoxのようなポップアップする画像ビューア
・アニメーション・ビュー              アニメーション効果を持ったビュー
・スライドスクロールボックス         自動的にスクロールするメニュー
・バイブレーション・キャンバス       入力不正等に利用するコントロールが震えるキャンバス
・ローテーター                       画像やニュース等がローテーションされるコンテナ
・ウィザード                          ウィザードを簡易に作れるコンテナ
・ディスクロージャー                 コントロールを表示・非表示と切り替えれるフレーム
・クリックなしタブ切り替えコンテナ   クリックすることなくタブのきりかえれるタブコンテナやアコーディオン

イベント部品

・マウス・ジェスチャー               マウス操作によるイベント
・イベントマネージャ                 スパゲッティコードをなくすため、イベントを統合的に管理
・アニメーションタイマー             アニメーション用のタイマー・

その他

・インジケーター                     処理実行待ち用のインジケーター
・ファイルサイズ・ファイルピッカー   ファイル制限のできるファイルピッカー
・操作のキャプチャと自動再生      操作を記録し、再度実行できるツール
・サムネイル作成                   サムネイル作成のためのAPI

★★★  各コントロールの詳細な利用方法はこちらのページを参照ください。  ★★★


ポップアップ画像ビューア

動作

LigthBoxのようなポップアップする画像ビューアーです。 

バージョン

Curl Advanced UI 0.5

API説明

ImagePopupButtonクラス

ポップアップ画像ビューアを作成するクラスです。

パッケージ

COM.CURLAP.ADVANCED-UI.CONTAINERS

スーパークラス

Frame

コンストラクタ

default
引数1(URL):サムネイル画像のURL(画像が存在しない場合は、”No Image”という画像が表示されます。)
引数2(URL):表示画像のURL(画像が存在しない場合は、”No Image”という画像が表示されます。)
キーワード引数(title:String = “”):LightBoxビューの左下に表示される画像のタイトル
キーワード引数(group-name:String = “”):同一グループの表示画像を一連で表示します。
  (同一名称の画像を、画像上のPrev、Nextボタンで順に表示します。””を指定した場合は、Applet内の全lightbox-popup-buttonがグループとなります。)
キーワード引数(tooltip:#String = “”):サムネイル画像上にマウスがある時に表示されるTooltip

メソッド

なし

利用方法

ポップアップ画像ビューアを利用するには、ImagePopupButtonにURLを指定して作成します。グループが存在する場合は、画像上部の右側、もしくは、左側にマウスを移動した際に表示される、Prev、Nextボタンで、順に表示することができます。また、Prev、Next動作は、左矢印キー、右矢印キーでも行えますし、表示画像はCloseボタン、もしくは、ESCキーで閉じることができます。

{curl 6.0 applet}
{applet manifest = “manifest.mcurl”,
    {compiler-directives careful? = true}
}

{import * from COM.CURLAP.ADVANCED-UI.CONTAINERS}

{let img1:ImagePopupButton = {ImagePopupButton
                                      width = 100pt,
                                      height = 100pt,
                                      {url “./images/Garden-s.jpg”},
                                      {url “./images/Garden.jpg”},
                                      title = “Image No.1”,
                                      group-name = “GROUP-1”,
                                      tooltip = “Image No.1\nThe new line is possible, too.”
                                  }}
{let img2:ImagePopupButton = {ImagePopupButton
                                      width = 100pt,
                                      height = 100pt,
                                      {url “./images/Oryx Antelope-s.jpg”},
                                      {url “./images/Oryx Antelope.jpg”},
                                      title = “Image No.2”,
                                      group-name = “GROUP-1”,
                                      tooltip = “Image No.2”
                                  }}
{let img3:ImagePopupButton = {ImagePopupButton
                                      width = 100pt,
                                      height = 100pt,
                                      {url “./images/Island-s.jpg”},
                                      {url “./images/Island.jpg”},
                                      title = “Image No.3”,
                                      group-name = “GROUP-1”,
                                      tooltip = “Image No.3”,
                                      animation-type = ImagePopupViewAnimationType.width-and-height
                                  }}
{let img4:ImagePopupButton= {ImagePopupButton
                                      width = 100pt,
                                      height = 100pt,
                                      {url “./images/Forest-s.jpg”},
                                      {url “./images/Forest.jpg”},
                                      title = “Image No.4”,
                                      group-name = “GROUP-1”,
                                      tooltip = “Image No.4”
                                  }}
{let img5:ImagePopupButton = {ImagePopupButton
                                      width = 100pt,
                                      height = 100pt,
                                      {url “./images/Forest Flowers-s.jpg”},
                                      {url “./images/Forest Flowers.jpg”},
                                      title = “Image No.5”,
                                      group-name = “GROUP-1”,
                                      tooltip = “Image No.5”
                                  }}
{let img6:ImagePopupButton = {ImagePopupButton
                                      width = 100pt,
                                      height = 100pt,
                                      {url “./images/Island-s.jpg”},
                                      {url “./images/Island.jpg”},
                                      title = “Image No.6”,
                                      group-name = “GROUP-2”,
                                      tooltip = “Image No.6”
                                  }}
{let img7:lightbox-popup-button = {ImagePopupButton
                                      width = 100pt,
                                      height = 100pt,
                                      {url “./images/sunset-s.jpg”},
                                      {url “./images/sunset.jpg”},
                                      title = “Image No.7”,
                                      group-name = “GROUP-3”,
                                      tooltip = “Image No.7”
                                  }}
{let img8:ImagePopupButton = {ImagePopupButton
                                      width = 100pt,
                                      height = 100pt,
                                      {url “./images/palm-s.jpg”},
                                      {url “./images/palm.jpg”},
                                      title = “Image No.8”,
                                      group-name = “GROUP-3”,
                                      tooltip = “Image No.8”
                                  }}
{let img10:ImagePopupButton = {ImagePopupButton
                                       width = 100pt,
                                       height = 100pt,
                                       {url “./images/Garden-s.jpg”},
                                       {url “./images/Garden.jpg”},
                                       title = “Normal Size”,
                                       group-name = “GROUP-4”,
                                       tooltip = “Normal Size”
                                   }}
{let img11:ImagePopupButton = {ImagePopupButton
                                       width = 100pt,
                                       height = 100pt,
                                       {url “./images/Garden-2.jpg”},
                                       {url “./images/Garden-2.jpg”},
                                       title = “When height is insufficient.”,
                                       group-name = “GROUP-4”,
                                       tooltip = “When height is insufficient.”
                                   }}
{let img12:ImagePopupButton = {ImagePopupButton
                                       width = 100pt,
                                       height = 100pt,
                                       {url “./images/Garden-3.jpg”},
                                       {url “./images/Garden-3.jpg”},
                                       title = “When width is insufficient.”,
                                       group-name = “GROUP-4”,
                                       tooltip = “When width is insufficient.”
                                   }}
{let img13:ImagePopupButton = {ImagePopupButton
                                       width = 100pt,
                                       height = 100pt,
                                       {url “./images/Garden-s.jpg”},
                                       {url “./images/Garden.jpg”},
                                       title = “Normal Size”,
                                       group-name = “GROUP-4”,
                                       tooltip = “Normal Size”
                                   }}
{value
    {VBox
        {HBox
            img1,
            img2,
            img3,
            img4,
            img5
        },
        {HBox
            img6
        },
        {HBox
            img7,
            img8
        },
        {HBox
            img10,
            img11,
            img12,
            img13
        }
    }
}


関連Curl標準API

Frame


カルーセルメニュー

動作

回転木馬のようにメニューを回転させて選択することがてきます。

バージョン

Curl Advanced UI 0.5

API説明

Carouselクラス

パッケージ

COM.CURLAP.ADVANCED-UI.UTILS

利用方法

とても簡単。

Carouselクラスのコンストラクタの引数に表示したい画像(Pixmapオブジェクト)を渡すだけ。

let carousel:Carousel = {Carousel
                                {ReflectImage width = 80pt, height = 120pt, {url “”}, from-pixmap = {SolidBorderFrame {url “./images/normal_leopard3.jpg”}}.pixmap, reflect-height = 70}.pixmap,
                                {ReflectImage width = 80pt, height = 120pt, {url “”}, from-pixmap = {SolidBorderFrame {url “./images/normal_polarbear2.jpg”}}.pixmap, reflect-height = 70}.pixmap,
                                {ReflectImage width = 80pt, height = 120pt, {url “”}, from-pixmap = {SolidBorderFrame {url “./images/normal_gopher.jpg”}}.pixmap, reflect-height = 70}.pixmap,
                                {ReflectImage width = 80pt, height = 120pt, {url “”}, from-pixmap = {SolidBorderFrame {url “./images/normal_duckling.jpg”}}.pixmap, reflect-height = 70}.pixmap,
                                {ReflectImage width = 80pt, height = 120pt, {url “”}, from-pixmap = {SolidBorderFrame {url “./images/normal_zoolemur1.jpg”}}.pixmap, reflect-height = 70}.pixmap,
                                {ReflectImage width = 80pt, height = 120pt, {url “”}, from-pixmap = {SolidBorderFrame {url “./images/normal_05redpanda.jpg”}}.pixmap, reflect-height = 70}.pixmap,
                                {ReflectImage width = 80pt, height = 120pt, {url “”}, from-pixmap = {SolidBorderFrame {url “./images/normal_05fox.jpg”}}.pixmap, reflect-height = 70}.pixmap,
                                {ReflectImage width = 80pt, height = 120pt, {url “”}, from-pixmap = {SolidBorderFrame {url “./images/normal_cowchew.jpg”}}.pixmap, reflect-height = 70}.pixmap,
                                {ReflectImage width = 80pt, height = 120pt, {url “”}, from-pixmap = {SolidBorderFrame {url “./images/normal_kangaroo.jpg”}}.pixmap, reflect-height = 70}.pixmap,
                                {ReflectImage width = 80pt, height = 120pt, {url “”}, from-pixmap = {SolidBorderFrame {url “./images/normal_zoollama.jpg”}}.pixmap, reflect-height = 70}.pixmap}

引数で渡された画像を”いい感じ”に自動配置しくるくる回ります。


サンプル

t-carousel.curl

t-carousel2.curl

関連Curl標準API

3D系全般

キューブフレーム

動作

正六面体の各面がFrameになっており、画面遷移の際に3D表示になってダイナミックにアニメーションしながら回転します。


バージョン

Curl Advanced UI 0.5

API説明

CubeFrameクラス

画面遷移の際に3Dの正六面体になってダイナミックにアニメーションしながら画面遷移します。

パッケージ

COM.CURLAP.ADVANCED-UI.CONTROLS

スーパークラス

Frame

プロパティ

button-placement:ButtonPlacement メニューボタンの位置

frames:{Array-of Frame} 正六面体の各面に表示するフレーム

index:int 現在表示されて画面のインデックス

コンストラクタ

default
引数1(frames:{Array-of Frame}):正六面体の各面に表示するフレーム

引数2(button-placement:ButtonPlacement = ButtonPlacement.top):メニューボタンの位置

※初期設定ではメニューボタンの位置はキューブフレームの上側になります。

メソッド

rotate インデックスで指定した画面に画面遷移します。メニューボタンを表示しない場合、このメソッドを使用してアニメーションさせる事ができます。
    引数1(index:int):遷移先の画面のインデックス

ButtonPlacement(列挙型)

メニューボタンの位置情報を持ちます。

パッケージ

COM.CURLAP.ADVANCED-UI.UTILS

スーパークラス

なし

要素

top ボタンアイコン画像の位置は名称ラベルの上側になります。

bottom ボタンアイコン画像の位置は名称ラベルの下側になります。

left ボタンアイコン画像の位置は名称ラベルの左側になります。

right ボタンアイコン画像の位置は名称ラベルの右側になります。

none メニューボタンを表示しません。

利用方法

六面体の各面に設定するフレーム、メニューボタンの位置を設定してキューブフレームを作成します。

{curl 6.0 applet}
{curl-file-attributes character-encoding = “utf8”}

{applet manifest = “manifest.mcurl”}

{import * from CURL.GRAPHICS.SCENE}
{import * from CURL.DATA-ACCESS.BASE}
{import * from COM.CURL.GUI.STYLED-CONTROLS}

{import * from COM.CURLAP.ADVANCED-UI.CONTROLS}
{import * from COM.CURLAP.ADVANCED-UI.UTILS}
{import * from CURL.GUI.SHAPES}
{import * from CURL.GUI.CHARTS}

{install-style-sheet {manifest-url “file”, “DEFAULT-STYLE-SHEET”}}

{define-enum public Rank
    First,
    Second,
    Third
}

|| RecordData
{let records:RecordSet =
    {RecordSet
        {RecordFields
            {RecordField
                “id”, caption = “User ID”, domain = int,
                index-type = RecordFieldIndexType.unique
            },
            {RecordField “Last”, domain = String},
            {RecordField “First”, domain = String},
            {RecordField “City”, domain = String},
            {RecordField “State”, domain = String},
            {RecordField “Date”, domain = {StandardDateDomain}},
            {RecordField “Time”, domain = Time},
            {RecordField “Rank”, domain = Rank},
            {RecordField “Notified?”, domain = bool}
        },
        {RecordData id = 1, Last = “Smith”, First = “Gene”, City = “Boston”, State = “MA”, Date = “01/25/2006”, Time = “08:30”, Rank = “First”, Notified? = false},
        {RecordData id = 2, Last = “Smith”, First = “Fred”, City = “Cambridge”, State = “MA”, Date = “01/25/2006”, Time = “08:30”, Rank = “First”, Notified? = true},
        {RecordData id = 3, Last = “Smith”, First = “Mike”, City = “Keene”, State = “NH”, Date = “01/25/2006”, Time = “08:30”, Rank = “First”, Notified? = false},
        {RecordData id = 4, Last = “Smith”, First = “Ben”, City = “New Haven”, State = “CT”, Date = “01/25/2006”, Time = “08:30”, Rank = “First”, Notified? = false},
        {RecordData id = 5, Last = “Abrams”, First = “Ben”, City = “Boston”, State = “MA”, Date = “01/25/2006”, Time = “08:30”, Rank = “Second”, Notified? = true},
        {RecordData id = 6, Last = “Jones”, First = “Sam”, City = “Storrs”, State = “CT”, Date = “01/25/2006”, Time = “08:30”, Rank = “Third”, Notified? = false},
        {RecordData id = 7, Last = “Stevens”, First = “Nigel”, City = “Hartford”, State = “CT”, Date = “01/25/2006”, Time = “08:30”, Rank = “First”, Notified? = false},
        {RecordData id = 8, Last = “Stevens”, First = “Bert”, City = “Cambridge”, State = “MA”, Date = “01/25/2006”, Time = “08:30”, Rank = “First”, Notified? = true},
        {RecordData id = 9, Last = “Linden”, First = “Pat”, City = “Hartford”, State = “CT”, Date = “01/25/2006”, Time = “08:30”, Rank = “First”, Notified? = false},
        {RecordData id = 10, Last = “Abrams”, First = “Mat”, City = “Boston”, State = “MA”, Date = “01/25/2006”, Time = “08:30”, Rank = “Third”, Notified? = true},
        {RecordData id = 11, Last = “Rogers”, First = “John”, City = “Cambridge”, State = “MA”, Date = “01/25/2006”, Time = “08:30”, Rank = “First”, Notified? = false},
        {RecordData id = 12, Last = “Abrams”, First = “Dan”, City = “Keene”, State = “NH”, Date = “01/25/2006”, Time = “08:30”, Rank = “Second”, Notified? = false},
        {RecordData id = 13, Last = “Abrams”, First = “Chris”, City = “Cambridge”, State = “MA”, Date = “01/25/2006”, Time = “08:30”, Rank = “First”, Notified? = true},
        {RecordData id = 14, Last = “Abrams”, First = “Glenn”, City = “Keene”, State = “NH”, Date = “01/25/2006”, Time = “08:30”, Rank = “First”, Notified? = true},
        {RecordData id = 15, Last = “Jones”, First = “Doug”, City = “New Haven”, State = “CT”, Date = “01/25/2006”, Time = “08:30”, Rank = “Third”, Notified? = true},
        {RecordData id = 16, Last = “Rogers”, First = “Susan”, City = “Concord”, State = “NH”, Date = “01/25/2006”, Time = “08:30”, Rank = “First”, Notified? = false},
        {RecordData id = 17, Last = “Smith”, First = “Joan”, City = “Concord”, State = “MA”, Date = “01/25/2006”, Time = “08:30”, Rank = “Second”, Notified? = false},
        {RecordData id = 18, Last = “Frankel”, First = “Tom”, City = “Keene”, State = “NH”, Date = “01/25/2006”, Time = “08:30”, Rank = “Third”, Notified? = false},
        {RecordData id = 19, Last = “Frankel”, First = “Sarah”, City = “Concord”, State = “NH”, Date = “01/25/2006”, Time = “08:30”, Rank = “First”, Notified? = false},
        {RecordData id = 20, Last = “Jones”, First = “John”, City = “Keene”, State = “NH”, Date = “01/25/2006”, Time = “08:30”, Rank = “First”, Notified? = false},
        {RecordData id = 21, Last = “Frankel”, First = “Pam”, City = “Storrs”, State = “CT”, Date = “01/25/2006”, Time = “08:30”, Rank = “Second”, Notified? = false}
    }
}

{let frame1:Frame =
    {Frame
        border-color = “gray”,
        border-width = 1pt,
        width = 400pt,
        height= 400pt,
        {VBox
            {big {bold No.1}},
            {TextField
                width = 100pt
            },
            {ComboBox
                “aaa”,
                “bbb”,
                “ccc”,
                width = 100pt
            },
            {HBox
                {CheckButton},
                {CheckButton},
                {CheckButton},
                {CheckButton}
            },
            {RadioFrame
                {HBox
                    {RadioButton},
                    {RadioButton},
                    {RadioButton}
                }
            },
            {RecordGrid
                record-source = records,
                width = {add-stretch},
                height = {add-stretch}
            }
        }
    }
}

{let frame2:Frame =
    {Frame
        {VBox
            border-color = “gray”,
            border-width = 1pt,
            width = 400pt,
            height= 400pt,
            {big {bold No.2}},
            {TextField
                width = 100pt
            },
            {TextField
                width = 100pt
            },
            {TextField
                width = 100pt
            },
            {TextField
                width = 100pt
            },
            {TextField
                width = 100pt
            },
            {TextField
                width = 100pt
            },
            {ComboBox
                “aaa”,
                “bbb”,
                “ccc”,
                width = 100pt
            },
            {HBox
                {CheckButton},
                {CheckButton},
                {CheckButton},
                {CheckButton}
            },
            {HBox
                {CheckButton},
                {CheckButton},
                {CheckButton},
                {CheckButton}
            },
            {RadioFrame
                {HBox
                    {RadioButton},
                    {RadioButton},
                    {RadioButton}
                }
            },
            {GroupBox
                label = “Group1”,
                {HBox
                    {ComboBox
                        “aaa”,
                        “bbb”,
                        “ccc”,
                        width = 100pt
                    },
                    {ComboBox
                        “aaa”,
                        “bbb”,
                        “ccc”,
                        width = 100pt
                    },
                    {TextField}
                }
            },
            {GroupBox
                label = “Group2”,
                {HBox
                    {ComboBox
                        “aaa”,
                        “bbb”,
                        “ccc”,
                        width = 100pt
                    },
                    {ComboBox
                        “aaa”,
                        “bbb”,
                        “ccc”,
                        width = 100pt
                    },
                    {TextField}
                }
            },
            {GroupBox
                label = “Group3”,
                {HBox
                    {ComboBox
                        “aaa”,
                        “bbb”,
                        “ccc”,
                        width = 100pt
                    },
                    {ComboBox
                        “aaa”,
                        “bbb”,
                        “ccc”,
                        width = 100pt
                    },
                    {TextField}
                }
            },
            {GroupBox
                label = “Group4”,
                {HBox
                    {ComboBox
                        “aaa”,
                        “bbb”,
                        “ccc”,
                        width = 100pt
                    },
                    {ComboBox
                        “aaa”,
                        “bbb”,
                        “ccc”,
                        width = 100pt
                    },
                    {TextField}
                }
            },
            {GroupBox
                label = “Group5”,
                {HBox
                    {ComboBox
                        “aaa”,
                        “bbb”,
                        “ccc”,
                        width = 100pt
                    },
                    {ComboBox
                        “aaa”,
                        “bbb”,
                        “ccc”,
                        width = 100pt
                    },
                    {TextField}
                }
            }
        }
    }
}

{let frame3:Frame =
    {Frame
        {VBox
            border-color = “gray”,
            border-width = 1pt,
            width = 400pt,
            height= 400pt,
            {big {bold No.3}},
            {HBox
                {ComboBox
                    “aaa”,
                    “bbb”,
                    “ccc”,
                    width = 100pt
                },
                {ComboBox
                    “aaa”,
                    “bbb”,
                    “ccc”,
                    width = 100pt
                }
            },
            {TextField
                width = 100pt
            },
            {ComboBox
                “aaa”,
                “bbb”,
                “ccc”,
                width = 100pt
            },
            {HBox
                {CheckButton},
                {CheckButton},
                {CheckButton},
                {CheckButton}
            },
            {TextArea
                width = {add-stretch},
                height = {add-stretch}
            }
        }
    }
}

{let frame4:Frame =
    {Frame
        {VBox
            border-color = “gray”,
            border-width = 1pt,
            width = 400pt,
            height= 400pt,
            {big {bold No.4}},
            {RichTextArea
                width = {add-stretch},
                height = {add-stretch}
            }
        }   
    }
}

{let messages:RecordSet =
    {RecordSet
        {RecordFields
            {RecordField “Recipient”, domain = String},
            {RecordField “Message”, domain = String}
        }
    }
}
{define-class public open CodeCell
  {inherits StandardRecordGridCell}
  {constructor public {default}
    {construct-super}
    {self.add-internal {TextFlowBox}}
  }
  {method public open {refresh-data}:void
    {super.refresh-data}
    let (data:String, valid?:bool) = {self.get-formatted-data}
    {self.child.graphic.clear}
    {if valid? then
        {self.child.graphic.add
            {evaluate data}
        }
    }
  }
}
{let rg:RecordGrid =
    {RecordGrid
        record-source = messages,
        automatic-columns? = false,
        width = 400pt,
        height = 350pt,
        {RecordGridColumn “Recipient”},
        {RecordGridColumn “Message”, cell-spec = CodeCell}
    }
}
{let rcp:String = “”}
{let msgstr:String = “”}
{let ta:TextArea = {TextArea
                       height = 150pt
                   }}
{let rta:RichTextArea = {RichTextArea
                            height = 150pt
                        }}

{let frame5:Frame =
    {Frame
        {VBox
            border-color = “gray”,
            border-width = 1pt,
            width = 400pt,
            height= 400pt,
            {big {bold No.5}},
            {Table
                {row-prototype “Message recipient: “, ta},
                {row-prototype “Message text: “, rta}
            },
            {HBox
                {CommandButton label = “Add Message”,
                    {on e:Action do
                        set rcp = ta.value
                        set msgstr = {rta.format-as-curl-source-fragment}
                        {messages.append {RecordData Recipient = rcp, Message = msgstr}}
                        {e.consume}
                    }
                },
                {CommandButton label = “Show Messages”,
                    {on e:Action do
                        {{Dialog {value rg}}.show}
                        {e.consume}
                    }
                }
            }
        }
    }
}

{let frame6:Frame =
    {Frame
        {VBox
            border-color = “gray”,
            border-width = 1pt,
            width = 400pt,
            height= 400pt,
            {big {bold No.6}},
            {Table
                border-width=1pt, border-color=”black”,
                cell-border-width=1pt, cell-border-color=”black”,
                {row-prototype font-weight=”bold”,
                    {cell-prototype {center Stretch{br}Order},
                        rowspan=2, halign=”center”, valign=”center”},
                    {cell-prototype “Curl Identifier Name”, colspan=2}},
                {row-prototype {skip 1}, “Meaning”, “Examples of Use”,
                    halign=”center”, font-weight=”bold”},
                {row-prototype {cell-prototype -10,
                                   rowspan=2, halign=”center”, valign=”center”},
                    {cell-prototype color=”blue”, colspan=2,
                        {monospace unstretchable-stretch-order}}},
                {row-prototype {skip 1},
                    {text “Unstretchable” (absolutely rigid) elastic},
                    {text Clearing an elastic to an unstretchable
                        length of 0}},
                {row-prototype {cell-prototype 0, rowspan=2, halign=”center”, valign=”center”},
                    {cell-prototype color=”blue”, colspan=2,
                        {monospace rigid-threshold-stretch-order}}},
                {row-prototype {skip 1},
                    {text Rigid elastic, stretching is highly undesirable},
                    {text Text, borders, and other objects that should
                        have a fixed size}
                },
                {row-prototype {cell-prototype -10,
                                   rowspan=2, halign=”center”, valign=”center”},
                    {cell-prototype color=”blue”, colspan=2,
                        {monospace unstretchable-stretch-order}}},
                {row-prototype {skip 1},
                    {text “Unstretchable” (absolutely rigid) elastic},
                    {text Clearing an elastic to an unstretchable
                        length of 0}},
                {row-prototype {cell-prototype 0, rowspan=2, halign=”center”, valign=”center”},
                    {cell-prototype color=”blue”, colspan=2,
                        {monospace rigid-threshold-stretch-order}}},
                {row-prototype {skip 1},
                    {text Rigid elastic, stretching is highly undesirable},
                    {text Text, borders, and other objects that should
                        have a fixed size}
                }
            }
        }
    }
}

{let my-cube:CubeFrame =
    {CubeFrame
        {{Array-of Frame}
            frame1,
            frame2,
            frame3,
            frame4,
            frame5,
            frame6
        },
        button-placement = “top”
    }
}

{View
    {Dialog
        background = “white”,
        margin = 10pt,
        {spaced-vbox
            {bold {big Cube Frame}},
            font-size = 30pt,
            font-family = “Curlz MT”,
            my-cube
        }
    },
    visibility = “normal”,
    {on WindowClose do
        {exit}
    }
}


サンプル

t-cube-frame.dcurl

関連Curl標準API

Frame


オシレーティングボタン

動作

ボタンにフォーカスを当てたり、ポインタを合わせるとボタンアイコン画像が振動するコマンドボタンです。

ボタンをクリックするとひときわ大きく振動します。


バージョン

Curl Advanced UI 0.5

API説明

OscillatingButtonクラス

ボタンにフォーカスイン、または、ボタン上にポインタを乗せるとボタンのアイコンが振動します。

ボタンをクリックするとひときわ大きく振動します。

パッケージ

COM.CURLAP.ADVANCED-UI.CONTROLS

スーパークラス

CommandButton

プロパティ

image-placement:LabelImagePlacement ボタンアイコン画像の位置

コンストラクタ

default
引数1(static-label:#Label = “”):ボタンに表示する名称ラベル

引数2(label-image:Pixmap):ボタンアイコン画像

引数3(image-placement:LabelImagePlacement = LabelImagePlacement.right):ボタンアイコン画像の位置

※初期設定ではボタンアイコン画像の位置は名称ラベルの右側になります。

LabelImagePlacement(列挙型)

ボタンアイコン画像の位置情報を持ちます。

パッケージ

COM.CURLAP.ADVANCED-UI.UTILS

スーパークラス

なし

要素

top ボタンアイコン画像の位置は名称ラベルの上側になります。

bottom ボタンアイコン画像の位置は名称ラベルの下側になります。

left ボタンアイコン画像の位置は名称ラベルの左側になります。

right ボタンアイコン画像の位置は名称ラベルの右側になります。

overlap ボタンアイコン画像の位置は名称ラベルに重なります。

利用方法

ボタンアイコン画像、名称ラベルを設定してオシレーティングボタンを作成します。

{curl 6.0 applet}
{curl-file-attributes character-encoding = “utf8”}
{applet manifest = “manifest.mcurl”}

{import * from COM.CURLAP.ADVANCED-UI.CONTROLS}
{import * from CURL.GUI.SHAPES}

{import * from COM.CURL.GUI.STYLED-CONTROLS}
{install-style-sheet
    {manifest-url “file”, “DEFAULT-STYLE-SHEET”}
}

{View
    {Dialog
        margin = 30pt,
        background = “white”,
        {Table
            border-width = 1pt,
            border-color=”black”,
            cell-border-width = 1pt,
            cell-border-color = “black”,
            halign = “center”,
            valign = “center”,
            {row-prototype
                {cell-prototype
                    {big {bold ImagePlacement}}
                },
                {cell-prototype “”}
            },
            {row-prototype
                {cell-prototype
                    {big {bold Right}}
                },
                {cell-prototype
                    {OscillatingCommandButton
                        static-label = {bold {big Search}},
                        {Pixmap.from-url
                            {url “./images/lens.png”}
                        }
                    }
                }
            },
            {row-prototype
                {cell-prototype
                    {big {bold Left}}
                },
                {cell-prototype
                    {OscillatingCommandButton
                        static-label = {bold {big Search}},
                        {Pixmap.from-url
                            {url “./images/lens.png”}
                        },
                        image-placement = “left”
                    }
                }
            },
            {row-prototype
                {cell-prototype
                    {big {bold Top}}
                },
                {cell-prototype
                    {OscillatingCommandButton
                        static-label = {bold {big Search}},
                        {Pixmap.from-url
                            {url “./images/lens.png”}
                        },
                        image-placement = “top”
                    }
                }
            },
            {row-prototype
                {cell-prototype
                    {big {bold Bottom}}
                },
                {cell-prototype
                    {OscillatingCommandButton
                        static-label = {bold {big Search}},
                        {Pixmap.from-url
                            {url “./images/lens.png”}
                        },
                        image-placement = “bottom”
                    }
                }
            },
            {row-prototype
                {cell-prototype
                    {big {bold Overlap}}
                },
                {cell-prototype
                    {OscillatingCommandButton
                        static-label = {bold {big Search}},
                        {Pixmap.from-url
                            {url “./images/lens.png”}
                        },
                        image-placement = “overlap”
                    }
                }
            },
            {row-prototype
                {cell-prototype
                    {big {bold style > label-only}}
                },
                {cell-prototype
                    {OscillatingCommandButton
                        {Pixmap.from-url
                            {url “./images/lens.png”}
                        },
                        style = “label-only”
                    }
                }
            }
        }
    },
    visibility = “normal”,
    {on WindowClose do
        {exit}
    }
}


サンプル

t-oscillating-button.dcurl

関連Curl標準API

CommandButton


アニメーションボタン

動作

ボタンにフォーカスを当てたり、ポインタを合わせるとボタンアイコン画像の大きさが変化するコマンドボタンです。


バージョン

Curl Advanced UI 0.5

API説明

AnimationButtonクラス

ボタンにフォーカスイン、または、ボタン上にポインタを乗せるとボタンのアイコンが大きくなります。

ボタンからフォーカスアウト、または、ボタン上からポインタを離すとボタンのアイコンは元に戻ります。

パッケージ

COM.CURLAP.ADVANCED-UI.CONTROLS

スーパークラス

CommandButton

プロパティ

image-placement:LabelImagePlacement ボタンアイコン画像の位置

コンストラクタ

default
引数1(static-label:#Label = “”):ボタンに表示する名称ラベル

引数2(label-image:Pixmap):ボタンアイコン画像

引数3(image-placement:LabelImagePlacement = LabelImagePlacement.right):ボタンアイコン画像の位置

※初期設定ではボタンアイコン画像の位置は名称ラベルの右側になります。

LabelImagePlacement(列挙型)

ボタンアイコン画像の位置情報を持ちます。

パッケージ

COM.CURLAP.ADVANCED-UI.UTILS

スーパークラス

なし

要素

top ボタンアイコン画像の位置は名称ラベルの上側になります。

bottom ボタンアイコン画像の位置は名称ラベルの下側になります。

left ボタンアイコン画像の位置は名称ラベルの左側になります。

right ボタンアイコン画像の位置は名称ラベルの右側になります。

overlap ボタンアイコン画像の位置は名称ラベルに重なります。

利用方法

ボタンアイコン画像、名称ラベルを設定してアニメーションボタンを作成します。

{curl 6.0 applet}
{curl-file-attributes character-encoding = “utf8”}
{applet manifest = “manifest.mcurl”}

{import * from COM.CURLAP.ADVANCED-UI.CONTROLS}
{import * from CURL.GUI.SHAPES}

{import * from COM.CURL.GUI.STYLED-CONTROLS}
{install-style-sheet
    {manifest-url “file”, “DEFAULT-STYLE-SHEET”}
}

{let acb1:AnimationCommandButton =
    {AnimationCommandButton
        static-label = {bold {big Search}},
        {Pixmap.from-url
            {url “./images/mono-lens3.png”}
        },
        {on Action do
            {popup-message
                modal? = false,
                “PUSHED!”
            }
        }
    }
}

{let acb2:AnimationCommandButton =
    {AnimationCommandButton
        static-label = {bold {big Search}},
        {Pixmap.from-url
            {url “./images/mono-lens3.png”}
        }
    }
}

{View
    {Dialog
        height = 400pt,
        width = 400pt,
        background = “white”,
        valign = “center”,
        halign = “center”,
        {spaced-vbox
            spacing = 20pt,
            acb1,
            acb2,
            {DropdownList
                “top”,
                “left”,
                “bottom”,
                “right”,
                “overlap”,
                {on ValueFinished at ddl:DropdownList do
                    set acb1.image-placement = ddl.value
                    set acb2.image-placement = ddl.value
                }
            }
        }
    },
    visibility = “normal”,
    {on WindowClose do
        {exit}
    }
}

このサンプルでは、ドロップダウンリストから値を選択しますと、ボタンアイコン画像の位置が変更されます。

サンプル

t-animation-button.dcurl

関連Curl標準API

CommandButton


操作のキャプチャと自動再生

動作

操作をキャプチャ(記録)し、記録した操作を自動的に再生できます。また、Curl言語として操作内容が保存され、カスタマイズすることも可能です。これはテストや自動デモなどで利用することができます。

<記録>

<再生> 


バージョン

Curl Advanced UI 0.5

利用方法

現時点では、COM.CURLAP.ADVANCED-UI.TOOLSパッケージをインポートすることで利用できます。また、各コントロールやフレームにはtest-nameというプロパティを持っていますので、一意の名前をセットしてください。(将来的には利用方法が変更となる可能性があります。)

{curl 6.0 applet}
{curl-file-attributes character-encoding = “shift-jis”}
{applet manifest = “manifest.mcurl”}

{import * from COM.CURLAP.ADVANCED-UI.TOOLS}
{import * from COM.CURL.GUI.STYLED-CONTROLS}
{install-style-sheet {manifest-url “file”, “DEFAULT-STYLE-SHEET”}}

{value

    let base-frame:Frame = {Frame test-name = “/base-frame”}

    let frame2:Frame =
        {Frame
            test-name = “/frame2”,
            {spaced-vbox
                test-name = “/frame2/vbox1”,
                width = 5cm,
                {TextField test-name = “/frame2/tf1”},
                {TextField test-name = “/frame2/tf2”},
                {TextField test-name = “/frame2/tf3”}
            }
        }

    let frame1:Frame =
        {Frame
            test-name = “/frame1”,
            {spaced-vbox
                test-name = “/frame1/vbox1”,
                width = 5cm,
                {TextField
                    test-name = “/frame1/vbox1/tf1”
                },

                {TextField
                    test-name = “/frame1/vbox1/tf2”
                },

                {CheckButton
                    test-name = “/frame1/vbox1/cbtn1”
                },

                {ComboBox
                    test-name = “/frame1/vbox1/cb1”,
                    “1234”, “5678”, “aaaaa”
                },

                {spaced-hbox
                    {CommandButton
                        label = “move”,
                        test-name = “/frame1/vbox1/btn1”,
                        {on Action do
                            {base-frame.add frame2, replace? = true}
                        }
                    },

                    {CommandButton
                        label = “popup”,
                        test-name = “/frame1/vbox1/btn2”,
                        {on Action do
                            {popup-message
                                “Succeeded to cancel…”,
                                test-name = “/pop1”,
                                || HACK! test codes.
                                {on e:DialogShow at v:Dialog do
                                    {{UIContext.get-instance}.register v}
                                }
                            }
                        }
                    },

                    {CommandButton
                        label = “view”,
                        test-name = “/frame1/vbox1/btn3”,
                        {on Action do
                            def view =
                                {View
                                    test-name = “/view1”,
                                    width = 2cm, height = 2cm,
                                    {spaced-vbox
                                        {TextField test-name = “/view1/tf1”},
                                        {CommandButton
                                            label = “close”,
                                            test-name = “/view1/btn1”,
                                            {on Action do
                                                {view.close}
                                            }
                                        }
                                    },
                                    || HACK! test codes.
                                    {on e:ViewVisibilityEvent at v:View do
                                        {{UIContext.get-instance}.register v}
                                    }
                                }
                           
                            {view.show}
                        }
                    },

                    {CommandButton
                        label = “dialog”,
                        test-name = “/frame1/vbox1/btn4”,
                        {on Action do
                            def dia  =
                                {Dialog
                                    test-name = “/dia1”,
                                    width = 2cm, height = 2cm,
                                    {spaced-vbox
                                        {TextField test-name = “/dia1/tf1”},
                                        {CommandButton
                                            label = “close”,
                                            test-name = “/dia1/btn1”,
                                            {on Action do
                                                {dia.close “Dialog”}
                                            }
                                        }
                                    },
                                    || HACK! test codes.
                                    {on e:DialogShow at v:Dialog do
                                        {{UIContext.get-instance}.register v}
                                    }
                                }
                            || HACK! if modal? is true, it doesn’t work.
                            {dia.show modal? = false}
                        }
                    }
                }
            }
        }
    {base-frame.add frame1}

    base-frame
}


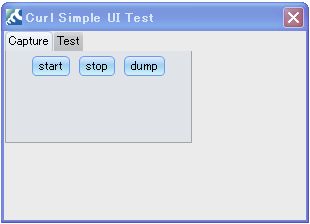
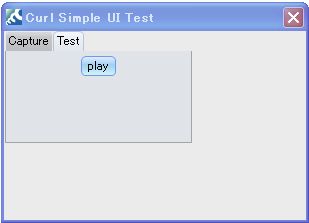
import文に COM.CURLAP.ADVANCED-UI.TOOLSを記述することで、自動的に記録・再生のビューが起動します。このCaptureタブのstartボタンを押下することで記録が開始されます。記録が開始されている時点でメイン画面の操作を行います。操作の記録を終了したい場合は、stopボタンを押下し、記録内容をファイルとして保存します。

ui-motion1.jpg


再度画面を読み込み、testタブのplayボタンを押下し、先ほど保存したファイルを選択いたしますと、先ほどの操作が自動的に実行されます。

ui-motion2.jpg


注意)
  Curlの仕様により、現バージョンでは、View、Dialog、dcurlに対する記録及び再生を行うことはできません。

当画面を変更したい場合は、直接オープンソースを変更し、改変することができます。(以下がキャプチャされたソースコードです。)


||| This following is generated code.
{do
    def handler = {UIMotionHandler.get-instance}

    {handler.sleep 5.788s}
    {handler.handle-event “/frame1/vbox1/tf1”, {FocusIn}}
    {handler.set-value “/frame1/vbox1/tf1”, “12345”}
    {handler.handle-event “/frame1/vbox1/tf1”, {FocusOut}}
    {handler.sleep 4.693s}
    {handler.handle-event “/frame1/vbox1/tf2”, {FocusIn}}
    {handler.set-value “/frame1/vbox1/tf2”, “abcde”}
    {handler.handle-event “/frame1/vbox1/tf2”, {FocusOut}}
    {handler.sleep 1.649s}
    {handler.handle-event “/frame1/vbox1/cbtn1”, {FocusIn}}
    {handler.set-value “/frame1/vbox1/cbtn1”, true}
    {handler.handle-event “/frame1/vbox1/cbtn1”, {FocusOut}}
    {handler.sleep 4.463s}
    {handler.handle-event “/frame1/vbox1/cb1”, {FocusIn}}
    {handler.set-value “/frame1/vbox1/cb1”, “5678”}
    {handler.handle-event “/frame1/vbox1/cb1”, {FocusOut}}
    {handler.sleep 0.897s}
    {handler.handle-event “/frame1/vbox1/btn1”, {Action}}
    {handler.sleep 0s}
    {handler.refresh-context}
    {handler.sleep 7.863s}
    {handler.handle-event “/frame2/tf1”, {FocusIn}}
    {handler.set-value “/frame2/tf1”, “ooooo”}
    {handler.handle-event “/frame2/tf1”, {FocusOut}}
    {handler.sleep 6.049s}
    {handler.handle-event “/frame2/tf2”, {FocusIn}}
    {handler.set-value “/frame2/tf2”, “12341234”}
    {handler.handle-event “/frame2/tf2”, {FocusOut}}
    {handler.sleep 4.447s}
    {handler.handle-event “/frame2/tf3”, {FocusIn}}
    {handler.set-value “/frame2/tf3”, “hohoho”}
    {handler.handle-event “/frame2/tf3”, {FocusOut}}
}


サンプル

自動キャプチャ 

関連Curl標準API

TextField
TextArea
DateField


ローテーター

動作

フレームが、ニュース・テロップやスライドショー、マーキー(marguee)のようにローテートされるコンポーネントです。


バージョン

Curl Advanced UI 0.5

API説明

RotatorDirection列挙型

  Rotatorのスクロール方向の列挙型

パッケージ

  COM.CURLAP.ADVANCED-UI.CONTAINERS

プロパティ

  up  上
  down 
  left 左
  right 

RotatorEventクラス

  ローテートのイベント

パッケージ

  COM.CURLAP.ADVANCED-UI.CONTAINERS

プロパティ

  index:int  現在のフレーム番号
  frame 現在のフレーム

RotatorCanvasクラス

  RotatorのCanvasクラスです。 

パッケージ

  COM.CURLAP.ADVANCED-UI.CONTAINERS

スーパークラス

  Canvas

プロパティ

    rotating-direction:RotatorDirection ローテートする方向
    rotating-interval:Time ローテート間隔
    rotating-repeat:int ローテート回数(-1は無制限)
    rotating-scroll-distance:Distance ローテートする間の幅
    rotating-scroll-interval:Time ローテートする間の感覚
    rotating-enabled?:bool ローテートするか否か

コンストラクタ

  default
    引数1(frames:{Array-of Frame}):ローテートするフレーム群
    キーワード引数(rotating-direction:RotatorDirection = RotatorDirection.up):ローテートする方向
    キーワード引数(rotating-interval:Time = 1s):ローテート間隔
    キーワード引数(rotating-repeat:int = -1):ローテート回数(-1は無制限)
    キーワード引数(rotating-scroll-distance:Distance = .05cm):ローテートする間の幅
    キーワード引数(rotating-scroll-interval:Time = .01s):ローテートする間の感覚
    キーワード引数(rotating-enabled?:bool = true):初期状態でローテートするか否か
     

メソッド

  enable-rotating ローテート開始
    戻り値: void

  disable-rotating ローテート終了
    戻り値: void
 

利用方法

RotateCanvasにローテートするフレームを渡して、フレームをローテートさせます。ローテートしますとRotateEventが発生します。

{curl 6.0 applet}
{curl-file-attributes character-encoding = “shift-jis”}
{applet manifest = “manifest.mcurl”}

{import * from COM.CURLAP.ADVANCED-UI.CONTAINERS}
{import * from COM.CURL.GUI.STYLED-CONTROLS}
{install-style-sheet
    {manifest-url “file”, “DEFAULT-STYLE-SHEET”}
}

{define-proc {make-RotateFrames
                 height:any = 0cm,
                 width:any = 0cm,
                 valign:any = “top”, || NOTE: important
                 …
             }:{Array-of Frame}
   
    def frames = {{Array-of Frame}}
    {for v in … do
        {if v isa Graphic then
            {frames.append
                {Frame v, height = height, width = width, valign = valign}
            }
        }
    }
    {return frames}
}

{value

    def frames1 =
        {make-RotateFrames height = 2cm, width = 2cm,
            {image source = {url “images/1.png”}},
            {image source = {url “images/2.png”}},
            {image source = {url “images/3.png”}}
        }

    def frames2 =
        {make-RotateFrames height = 3cm, width = 8cm,
            {TextFlowBox
                {paragraph {bold Android} An Open Handset Alliance ProjectHome
                    Docs FAQ Blog Group Terms Getting Started Learn about
                    Android Download the SDK Join the community.
                    Participate in our discussion group through
                    {text color = “blue”, email or the web.}
                }
            },
           
            {TextFlowBox
                {paragraph Top 50 apps announced From more than
                    {text color = “green”, 1,700 contest}
                    entries, these 50 entries will continue into the second
                    and final round of {text color = “blue”, font-size = 18pt,
                                           Android Developer Challenge.}
                }
            },

            {TextFlowBox
                {paragraph Featured Videos Sergey Brin and Steve Horowitz
                    discuss the availability of the SDK, that it will be
                    {text color = “red”, open source} in the future, and
                    demo some applications.
                }
            },
           
            {TextFlowBox
                {paragraph Three part overview of the Android architecture
                    and APIs First look at building an
                    {text color = “blue”, Android Application}
                    more videos The Open Handset Alliance, a group of more
                    than 30 technology and mobile companies, is developing
                }
            }
        }

    def frames3 =
        {make-RotateFrames
            height = 2cm, width = 2cm,
            {image source = {url “images/1.png”}},
            {image source = {url “images/2.png”}},
            {image source = {url “images/3.png”}},
            {image source = {url “images/4.png”}},
            {image source = {url “images/5.png”}},
            {image source = {url “images/6.png”}}
        }

    def frames4 =
        {{Array-of Frame}
            {Frame valign = “top”, width = 3cm, height = 3cm, background = “green”},
            {Frame valign = “top”, width = 3cm, height = 3cm, background = “yellow”},
            {Frame valign = “top”, width = 3cm, height = 3cm, background = “red”},
            {Frame valign = “top”, width = 3cm, height = 3cm, background = “blue”},
            {Frame valign = “top”, width = 3cm, height = 3cm, background = “pink”}}

    def frames5 =
        {{Array-of Frame}
            {Frame valign = “top”, width = 1cm, height = 2cm, background = “green”},
            {Frame valign = “top”, width = 1cm, height = 2cm, background = “yellow”},
            {Frame valign = “top”, width = 1cm, height = 2cm, background = “red”},
            {Frame valign = “top”, width = 1cm, height = 2cm, background = “blue”},
            {Frame valign = “top”, width = 1cm, height = 2cm, background = “pink”}}

    def canvas =
        {RotatorCanvas
            frames4,
            height = 3cm,
            width = 3cm,
            border-color = “pink”,
            border-width = 2pt
        }

    {spaced-vbox

        || images rotator
        {text font-size = 14pt, color = “blue”, Images rotator},
        {RotatorCanvas
            frames1,
            height = 2cm,
            width = 4cm,
            rotating-interval = 0s,
            rotating-scroll-interval = .02s,
            rotating-direction = RotatorDirection.left,
            background = “black”,
            border-color = “black”,
            border-width = 5pt
        },

        || news rotator
        {text font-size = 14pt, color = “blue”, News rotator},
        {RotatorCanvas
            frames2,
            height = 3cm,
            width = 8cm,
            rotating-interval = 3s,
            rotating-direction = RotatorDirection.down,
            rotating-scroll-interval = .01s,
            border-color = “grey”,
            border-width = 3pt
        },

        || slideshow rotator
        {text font-size = 14pt, color = “blue”, Slideshow rotator},
        {RotatorCanvas
            frames3,
            height = 2cm,
            width = 2cm,
            rotating-interval = 2s,
            rotating-direction = RotatorDirection.right,
            rotating-scroll-interval = .01s,
            border-color = “silver”,
            border-width = 2pt,
            || RotatorEvent
            {on e:RotatorEvent do
                {dump e.index, e.frame}
            }
        },

        || test rotator
        {text font-size = 14pt, color = “blue”, Test rotator},
        canvas,
       
        {spaced-hbox
            {CommandButton label = “stop”,
                    {on Action do
                        {canvas.disable-rotating}
                    }
            },
            {CommandButton label = “start”,
                {on Action do
                    {canvas.enable-rotating}
                }
            }
        },
   
        {RotatorCanvas
            frames5,
            height = 2cm,
            width = 1cm,
            rotating-interval = 1.5s,
            rotating-direction = RotatorDirection.down,
            rotating-scroll-interval = 0.001s
        }
    }

各種フレームがローテートします。

サンプル

ローテータサンプル

関連Curl標準API

Canvas
Frame


さっと掃けるView

動作

多くのビューを開いている際、画面外にさっと掃くことができます。また、戻すこともできます。

バージョン

Curl Advanced UI 0.5

API説明

SweepWindowクラス

Viewを画面外に掃くクラスです。

パッケージ

COM.CURLAP.ADVANCED-UI.CONTAINERS

スーパークラス

View

コンストラクタ

default
キーワード引数(view-owner:#SweepWindow = null):親のView
キーワード引数(corner:String = “upper-left”):sweepする方向
キーワード引数(sweep-key:char = KeyPressValue.f12):sweepするボタン

メソッド

sweep(手動で子Viewを画面外へ掃き出す)

restore(掃き出した子Viewを画面内へ戻す)

notify(Viewの状態に応じて、sweepとrestoreを呼び出す)

利用方法

親のSweepWindowを作成し、その親のSweepWindowを引数にセットして掃き出したり・戻したりするView(SweepWindow )を作成する。

{curl 6.0 applet}
{applet manifest = “manifest.mcurl”,
{compiler-directives careful? = true}
}

{import * from COM.CURLAP.ADVANCED-UI.CONTAINERS}
{import * from COM.CURL.GUI.STYLED-CONTROLS}
{install-style-sheet {manifest-url “file”, “DEFAULT-STYLE-SHEET”}}

{let pos_table:{Array-of Distance} = {{Array-of Distance}
150pt, 180pt,
333pt, 243pt,
355pt, 214pt,
70pt, 165pt
}
}

{let corner_table:{Array-of String} = {{Array-of String}
“upper-left”,
“upper-right”,
“lower-left”,
“lower-right”
}
}

{let cmb:CommandButton = {CommandButton
label = “Make some window”
}
}

|| 親SweepWindowの作成
{let first-parent:SweepWindow = {SweepWindow
width = 16cm,
height = 12cm,
halign = “center”,
valign = “center”,

{VBox
spacing = 40pt,
halign = “center”,
{bold Demo for Sweep Window},
cmb
},

visibility = “normal”,
{on WindowClose do
{exit}
}
}
}

{cmb.add-event-handler
{on Action do
{for i:int=0 to 3 step 1 do
|| 子SweepWindowの作成
let sw:SweepWindow = {SweepWindow
view-owner = first-parent, || 親SweepWindow
corner = corner_table[i rem 4],
width = 12cm,
height = 8cm,
halign = “center”,
valign = “center”,
visibility = “normal”
}
{sw.add “Press F12 to sweep & restore”}
{sw.set-position pos_table[i rem 4], pos_table[(i rem 4)*2+1]}
}
}
}

{value first-parent}


サンプル

SweepWindowサンプル

関連Curl標準API

View


スライドするScrollBox

動作

“すぃ~と”スクロールするスクロールボックスです。

バージョン

Curl Advanced UI 0.5

API説明

SlideScrollBoxクラス

パッケージ

COM.CURLAP.ADVANCED-UI.CONTAINERS

利用方法

とても簡単。

SlideScrollBoxクラスのコンストラクタの引数にスライドさせたいオブジェクトを渡すだけ。


   {SlideScrollBox width = 400pt, height = 50pt,
            {HBox spacing = 3pt,
                {Frame width = 49pt, height = 49pt, background = “aliceblue”, “This is TEst1”},
                {Frame width = 49pt, height = 49pt, background = “aliceblue”, “This is TEst2”},
                {Frame width = 49pt, height = 49pt, background = “aliceblue”, “This is TEst3”},
                {Frame width = 49pt, height = 49pt, background = “aliceblue”, “This is TEst4”},
                {Frame width = 49pt, height = 49pt, background = “aliceblue”, “This is TEst5”},
                {Frame width = 49pt, height = 49pt, background = “aliceblue”, “This is TEst6”},
                {Frame width = 49pt, height = 49pt, background = “aliceblue”, “This is TEst7”},
                {Frame width = 49pt, height = 49pt, background = “aliceblue”, “This is TEst8”},
                {Frame width = 49pt, height = 49pt, background = “aliceblue”, “This is TEst9”},
                {Frame width = 49pt, height = 49pt, background = “aliceblue”, “This is TEst0”},
                {Frame width = 49pt, height = 49pt, background = “aliceblue”, “This is TEst1”},
                {Frame width = 49pt, height = 49pt, background = “aliceblue”, “This is TEst2”}
            }
        }


引数で渡されたオブジェクトを”いい感じ”にすぃ~とスクロールして表示します。


サンプル

t-slidescrollbox.curl

関連Curl標準API

ScrollBox

反射フレーム

動作

反射しているように見せるフレームです。

バージョン

Curl Advanced UI 0.5

API説明

ReflectImageクラス

パッケージ

COM.CURLAP.ADVANCED-UI.UTILS

利用方法

とても簡単。

ReflectImageクラスのコンストラクタの引数に反射したい画像(PixmapオブジェクトかURL)を渡すだけ。


let init:ReflectImage = {ReflectImage reflect-height = 40, {url “./images/logo_curl.gif”}}


引数で渡された画像を”いい感じ”に反射させたようにして表示します。

docs_reflect.gif


サンプル

t-reflect.curl

関連Curl標準API

2Dレンダリング系全般

ドリルダウン・リストボックス

動作

ドリルダウン式にリストの値を変化させれるリストボックスです。


バージョン

Curl Advanced UI 0.5

API説明

DrillDownListBoxクラス

  ドリルダウンをするリストボックスのクラスです。 

パッケージ

  COM.CURLAP.ADVANCED-UI.CONTROLS

スーパークラス

  ListBox

プロパティ

  current-node:DrillDownNode 現在表示されているノード

コンストラクタ

  default
    引数1(root:DrillDownNode):ドリルダウンツリーのルートとなるノード 

メソッド

  drill-down 指定したノードへドリルダウンします。
    引数1(node:DrillDownNode):ドリルダウンするノード
    戻り値:void

  drill-up 現在のノードから1つ親ノードへドリルアップします。
    戻り値:void

  drill-up-to-pointed-node 指定したノードへドリルアップします。
    引数1(node:DrillDownNode):ドリルダウンするノード
    戻り値:void

DrillDownEventクラス

  ドリルダウンしたイベントのクラスです。 

パッケージ

  COM.CURLAP.ADVANCED-UI.CONTROLS

スーパークラス

  Event

プロパティ

  node:DrillDownNode ドリルダウンしたノード

DrillDownLeafEventクラス

  ドリルダウンしたイベントで、リーフに到達した場合に発生するイベントのクラスです。 

パッケージ

  COM.CURLAP.ADVANCED-UI.CONTROLS

スーパークラス

  Event

プロパティ

  leaf:DrillDownLead リーフ

DrillDownComponentクラス (abstract)

  ドリルダウンのデータの抽象クラスです。(これを継承したクラスにはDrillDownNodeとDrillDownLeafがあります。) 

パッケージ

  COM.CURLAP.ADVANCED-UI.CONTROLS

スーパークラス

  なし

プロパティ

  value:any 値
  parent:#DrillDownComponent 親のComponent

DrillDownNodeクラス 

  ドリルダウンのデータクラスです。このクラスは子のDrillDownComponentを持ちます 

パッケージ

  COM.CURLAP.ADVANCED-UI.CONTROLS

スーパークラス

  DrillDownComponent

プロパティ

  children:{Array-of DrillDownComponent} 子のDrillDownComponent(DrillDownNodeかDrillDownLeaf)
  children-values:{Array-of any} 子DrillDownComponentのvalueの配列

コンストラクタ

  default
    引数1(value:any):値

メソッド

  append ドリルダウンノードをchildrenへ追加します。
    引数1(com:DrillDownComponent):ドリルダウンデータのノード
    戻り値:void

  remove ドリルダウンノードをchildrenから削除します。
    引数1(com:DrillDownComponent):ドリルダウンデータのノード
    戻り値:void

DrillDownLeafクラス 

  ドリルダウンのデータクラスです。このクラスは子のDrillDownComponentを持ちません 

パッケージ

  COM.CURLAP.ADVANCED-UI.CONTROLS

スーパークラス

  DrillDownComponent

コンストラクタ

  default
    引数1(value:any):値


利用方法

DrillDownNodeとDrillDownLeafを用いてツリー構造を作成します。このツリー構造のルートを引数にDrillDownListBoxのインスタンスを生成します。

{curl 6.0 applet}
{curl-file-attributes character-encoding = “shift-jis”}
{applet manifest = “manifest.mcurl”}

{import * from COM.CURLAP.ADVANCED-UI.CONTROLS}

{import * from COM.CURL.GUI.STYLED-CONTROLS}
{install-style-sheet
    {manifest-url “file”, “DEFAULT-STYLE-SHEET”}
}

{define-class public DrillDownNodeButton
  {inherits CommandButton}

  field public-get node:DrillDownNode

  {constructor public {default
                          node:DrillDownNode,
                          …
                      }
    {construct-super {splice …}}
    set self.node = node
    set self.label = node.value & ” >”
  }
}

{def base-frame = {Frame}}

{do

    || data tree
    let root:DrillDownNode = {DrillDownNode “root”}
    {root.append {DrillDownLeaf “愛知県”}}
    {root.append {DrillDownLeaf “静岡県”}}
   
    let com1 = {DrillDownNode “千葉県”}
    {com1.append {DrillDownLeaf “千葉市”}}
    {com1.append {DrillDownLeaf “八千代市”}}
    {com1.append {DrillDownLeaf “市川市”}}
    {root.append com1}

    let com2 = {DrillDownNode “東京都”}
    {com2.append {DrillDownLeaf “世田谷区”}}
    {com2.append {DrillDownLeaf “港区”}}
    {root.append com2}

    let com3 = {DrillDownNode “八王子市”}
    {com3.append {DrillDownLeaf “1丁目”}}
    {com3.append {DrillDownLeaf “2丁目”}}
    {com2.append com3}

    let com4 = {DrillDownNode “八王子村”}
    {com4.append {DrillDownLeaf “1丁目”}}
    {com3.append com4}


    let page:HBox = {spaced-hbox height = 1cm}
    let list:DrillDownListBox =
        {DrillDownListBox
            root,
            height = 5cm,
            width = 3cm,
            font-size = 16pt,
            || listen DrillDownEvent
            {on e:DrillDownEvent at v:DrillDownListBox do
                {page.add
                    {DrillDownNodeButton
                        e.node,
                        style = “rollover”,
                        {on Action at v:DrillDownNodeButton do
                            {list.drill-up-to-pointed-node v.node}
                            {for n in page.reverse-ordered-children do
                                {if (n asa DrillDownNodeButton).node != v.node
                                 then
                                    {n.detach}
                                 else
                                    {break}
                                }
                            }
                        }
                    }
                }
            },
            || listen DrillDownLeafEvent
            {on e:DrillDownLeafEvent at v:DrillDownListBox do
                {popup-message e.leaf.value}
            }
        }
   
    {base-frame.add
        {spaced-vbox
            page,
            list,
            width = 10cm,
            {spaced-hbox
                {CommandButton
                    label = “drill up”,
                    {on Action do
                        {list.drill-up}
                        {{page.reverse-ordered-children.read-one}.detach}
                    }
                }
            }
        }
    }
}

{View
    base-frame,
    visibility = “normal”,
    {on WindowClose do
        {exit}
    }

このサンプルでは、リストボックスから値を選択しますと、ドリルダウンをし、その子要素の一覧にリストボックス内の値が変更されます。

サンプル

ドリルダウンリストボックス

関連Curl標準API

ListBox