ドラッグ アンド ドロップ

要約:
  • ドラッグ アンド ドロップ機能は、あるグラフィック オブジェクトが他のグラフィック オブジェクトに「ドロップ」されたときにタスクを実行するために使用されます。
  • 任意のグラフィック オブジェクトにドラッグ アンド ドロップ機能を追加することができます。
  • ドラッグ アンド ドロップの関係には、少なくとも 1 つの「ドラッグ対象」と「ドロップ先」が必要です。
  • ドロップ操作の効果をやりとりするビジュアル キュー (カーソルの変化など) を付けることができます。
  • ドラッグ対象 Type、ポインタの座標、または CTRL キーの状態などの情報を使用してより複雑なドラッグ アンド ドロップ操作を生成することができます。
Curl® 言語のドラッグ アンド ドロップ (またはドラッグ / ドロップ) メカニズムは、ユーザーがビジュアル オブジェクトを他のビジュアル オブジェクト上にドラッグし、ポインタのボタンを解放したときにタスクを実行するために使用されます。ドラッグ アンド ドロップを使用して実行される一般的なタスクは、コピー、移動、およびデータとオブジェクト間のリンクの作成です。
Curl GUI ツールキットは、ホスト システムにドラッグ / ドロップ メカニズムがある場合はそのメカニズムと共に動作するドラッグ / ドロップ メカニズムをサポートしています。ドラッグ / ドロップ メカニズムは GUI ツールキットの GuiManager で管理されます。
このメカニズムを使用すると、ドラッグ アンド ドロップ操作の効果についてユーザーに情報を提供することができます。特殊なカーソルで、これらの一般的な操作のどれが実行されるのかを示します。ドラッグ アンド ドロップ操作で実行される実際のタスクは、記述されたプロシージャによって決まります。
グラフィックと同様にシェイプもドラッグ アンド ドロップすることができます。 「シェイプ」 の 「ドラッグ アンド ドロップ」 セクションを参照してください。
低位レベルでは、ドラッグされたデータは DataTransferSourceSet で表示されます。セットの各要素は DataTransferSource で、通常は複数のフォーマットで取得される単一のデータを表示します。

単純なドラッグ アンド ドロップ関係の作成

グラフィックをドラッグ可能にする簡単な方法は、グラフィック オブジェクトの Graphic.dragee プロパティを ImageDragee に設定することです。
ドラッグ / ドロップ中に発生するイベントには次のものがあります。
単純なドラッグ アンド ドロップ関係は、次の要素で構成されています。標準グラフィック オブジェクトを修正してこれらの要素を作成します。

必要なステップ

ドラッグ アンド ドロップ関係の作成に必要なステップを次に説明します。各ステップは次の例で示します。
次の手順を実行してドラッグ アンド ドロップ関係を作成します。
  1. 標準グラフィック オブジェクトからドラッグ対象を作成します。
    この手順は Graphic.dragee オプションを ImageDragee に設定して行います。
    ドラッグ中のオブジェクトに必要な唯一のステップです。次の例のコメントを参照してください。
  2. 標準グラフィック オブジェクトからドロップ先を作成します。この手順は、そのオブジェクト上で DragOver イベントを処理することにより行います。
    この手順には次の項目が含まれます。 デモンストレーションについては次の例を参照してください。
  3. ドロップ先での Drop イベントの処理
    この手順は次のように行います。

単純なドラッグ アンド ドロップの例


例: "単純なドラッグ アンド ドロップ関係の作成"
{HBox spacing = 5cm, valign = "center",

    || Step 1: this circle is the 'dragee' It can be dragged
    || because the dragee option is set.  NOTE: It must be set to
    || ImageDragee.
    {EllipseGraphic width = 1cm, height = 1cm, dragee = {ImageDragee}},

    {Frame || Step Two: this image is the 'drop target'.
        width = 2cm, height = 2cm,
        background = {Background {url "../../default/images/shopping-cart.gif"}},

        || The following line handles the DragOver event.  You
        || must assign the event to a variable (in this case 'e')
        || so that you can call its will-accept-drop? method.
        {on e:DragOver do 
            {e.will-accept-drop?

                || Returns one of the four DragEffect constants.
                || You must include four positional arguments of
                || the same data types, as shown below.
                {proc {type:Type, x:Distance, y:Distance,
                       effect:#DragEffect}:DragEffect
                    {return drag-effect-copy}
        } } }, || stacked for compactness

        || Step Three: The following line handles the Drop event.
        || You must assign the event to a variable (in this case
        || 'e') so that you can call its accept-drop method.
        {on e:Drop do
            {e.accept-drop

                || Return one of the four DropResult objects.  You
                || must include four positional arguments of the
                || same data types, as shown below.
                {proc {a:any, x:Distance, y:Distance,
                       effect:#DragEffect}:DropResult
                    {return {DropResultCopy

                            || The 'action' argument to a
                            || DropResult object specifies what
                            || action occurs when the dragee is
                            || dropped.  Supply a procedure to the
                            || 'action' argument.
                            action = {proc {}:void
                                    {popup-message
                                        "You dropped the ball!",
                                        modal? = true}
} } } } } } } } 

より複雑なドラッグ アンド ドロップ関係

ドラッグ アンド ドロップ関係は、たいていの場合、上記の関係よりも複雑です。 より複雑なドラッグ アンド ドロップ関係におけるドロップ先は、一定の区別が できる必要があります。
たとえば次のようになります。

ドロップできるドラッグ対象の指定

ドロップ先が一定のドラッグ対象を 受け入れ他のものは受け入れないようにすることがあります。if 式を使用して 記述した任意の基準に基づいて、ドラッグ対象がドロップ先にドロップできるかどうかを 指定することができます。
この章のはじめに示した単純なドラッグ アンド ドロップ関係では、ドラッグ対象間で 識別する必要はありませんでした。ドロップ先にドラッグされるものはすべてドラッグできます。 DragOver.will-accept-drop? のプロシージャをより複雑にすることにより、ドラッグ 先にドロップできるドラッグ対象をコントロールすることができます。
DragOver イベントをドロップ先で処理するとき、次の 2 つのタスクを実行します。 次の例では、if 式を使用してドロップ先にドロップできるドラッグ対象を判断する方法を示します。例では、 この判断はドラッグ対象の Type に基づいています。

例: 目標にドロップできるドラッグ対象の指定
{VBox halign = "center", spacing = 1cm,

    || The four objects in this HBox are dragees.  Note that they
    || are of two types, EllipseGraphic and RectangleGraphic.
    {HBox spacing = 2cm,
        {RectangleGraphic
            width = 10mm, height = 14mm, dragee = {ImageDragee}},
        {EllipseGraphic
            width = 14mm, height = 10mm, dragee = {ImageDragee}},
        {RectangleGraphic
            width = 4mm, height = 16mm, dragee = {ImageDragee}},
        {EllipseGraphic
            width = 10mm, height = 14mm, dragee = {ImageDragee}}
    },

    {TextFlowBox    || This TextFlowBox is the drop target.
        border-width = 2pt, border-color = "black", margin = 5pt,
        {text font-size = 16pt, Please drop round objects on this box.},
        {on e:DragOver do
            {e.will-accept-drop?
                {proc
                    {type:Type, x:Distance, y:Distance, 
                     effect:#DragEffect}:DragEffect

                    || The following code specifies that
                    || EllipseGraphics can be dropped on the drop
                    || target and  other objects cannot.
                    || Note that the name of the first argument in
                    || the procedure (type) is used to call
                    || methods of the dragee.
                    {if {type.subtype-of? EllipseGraphic} then
                        {return drag-effect-copy}
                     else
                        {return drag-effect-none}
                    }
                }
            }
        },

        || The rest of  code handles the Drop event.  Note that
        || only one DropResult is specified. It is the DragEffect
        || that must distinguish between different dragees.
        {on e:Drop do
            {e.accept-drop
                {proc
                    {a:any,
                     x:Distance,
                     y:Distance,
                     effect:#DragEffect
                    }:DropResult
                    {return
                        {DropResultCopy
                            action =
                                {proc {}:void
                                    {popup-message
                                        modal? = true,
                                        "Success!"
} } } } } } } } } 

DropResult の指定

より複雑なドラッグ アンド ドロップ関係では、Drop イベントが発生した状況によってドロップ先が異なる動作をするようにできます。記述した任意の基準に基づいて、ドラッグ対象がドロップ先にドロップされたときに発生する動作を指定することができます。この例では、if 式を使用して行います。
この章のはじめに示した単純なドラッグ アンド ドロップ関係では、どのドロップ対象がドロップされるのかに関わりなくドロップ先は常に同じアクションを実行しますDrop.accept-drop のプロシージャをより複雑にすることにより、ドラッグ対象がドラッグ先にドロップされたときに発生する動作をコントロールすることができます。
次の例では、if 式を使用してドラッグ対象がドロップ先にドロップされたときに発生する動作を判断する方法を示します。例では、この判断はドラッグ対象の Type に基づいています。

例: の条件に基づいて DropDropResult を指定
{VBox halign = "center", spacing = 1cm,
    {HBox spacing = 2cm,

        || The following four objects are dragees, of two
        || different types (EllipseGraphic and RectangleGraphic).
        {RectangleGraphic
            width = 10mm, height = 14mm, dragee = {ImageDragee}},
        {EllipseGraphic
            width = 14mm, height = 10mm, dragee = {ImageDragee}},
        {RectangleGraphic
            width = 4mm, height = 16mm, dragee = {ImageDragee}},
        {EllipseGraphic
            width = 10mm, height = 14mm, dragee = {ImageDragee}
        }
    },
    {TextFlowBox        || The drop target.
        border-width = 2pt, border-color = "black", margin = 5pt,
        {text font-size = 16pt,
            Please drop {bold round} objects on this box},

        || The following code handles the DragOver event.
        || Any dragee can be dropped on this drop target.
        {on e:DragOver do
            {e.will-accept-drop?
                {proc
                    {type:Type,
                     x:Distance,
                     y:Distance,
                     effect:#DragEffect
                    }:DragEffect
                    {return drag-effect-copy}
                }
            }
        },

        || The following code handles the Drop event.  The
        || 'action' taken depends on the criteria in this 'if'
        || expression.  Note that the name of the first argument
        || in the procedure that returns the DropResult (a) refers
        || to the dragee.
        {on e:Drop do
            {e.accept-drop
                {proc
                    {a:any,
                     x:Distance,
                     y:Distance,
                     effect:#DragEffect}:DropResult
                    {return
                        {DropResultCopy
                            action =
                                {proc {}:void
                                    {if a isa EllipseGraphic then
                                        {popup-message
                                            modal? = true,
                                            "Correct.  The object is round."}
                                     else
                                        {popup-message
                                            modal? = true,
                                            "Wrong!  The object is not round."}
                                    } 
                                } 
                        } 
                    } 
                } 
            } 
        } 
    }
} 

ドラッグ アンド ドロップ イベント処理のプロシージャ

ドロップ先は通常 2 つのイベント、DragOverDrop を処理します。これらのイベントを処理するために、ソース コードは各イベントについて 1 つずつ、計 2 つのメソッドを呼び出す必要があります。これらは DragOver.will-accept-drop?Drop.accept-drop です。これはこの章のはじめの「単純なドラッグ アンド ドロップの例」で説明しました。
いずれのメソッドも単独引数として匿名プロシージャを取ります。これらのプロシージャはいずれも 4 つの位置引数を取ります。引数に任意の名前を付けることができますが、データ型は特定の順序で指定する必要があります。引数は、ドラッグ対象のデータ型またはポインタの位置のようなドラッグ アンド ドロップ操作の要素を表します。各引数に割り当てた名前を使用して、ソース コード内でこれらの要素を参照できます。DragOver.will-accept-drop? に与えられたプロシージャは、次のような定数によって代表される DragEffect を返します。
Drop.accept-drop に与えられたプロシージャは、次の DropResult サブクラスの内の1つを返します。

異なるドラッグ効果の使用

ドラッグ効果は、ドラッグ対象がドロップ先にドラッグされたときに変化するカーソルの外観で表示されます。カーソルの外観は、ポインタ ボタンを離すと何が起こるかをユーザーに知らせます。Curl 言語には、コピー、移動、リンク、および何もしないという 4 つのドラッグ効果があります。
ドロップ先で DragOver イベントを処理するとき、これらの 4 つのドロップ効果の 1 つを返すプロシージャを記述する必要があります。このプロシージャは、前に示した「単純なドラッグ アンド ドロップの例」で説明しました。このプロシージャで返されるドラッグ効果は、Drop アクションの結果には何も影響しません。ドラッグ効果はアプレットのユーザーへのサインとしてのみ使用されます。
次の表でサンプルのドロップ先に黒い円をドラッグします。カーソルはドラッグ効果の各タイプを表します。


ドラッグ アンド ドロップでの CTRL キーの使用

アプレットのユーザーが CTRL キーを使用して DropResult のコピーと移動を選択できるようにします。
アプレットのユーザーがドラッグ アンド ドロップ操作を開始すると、常に DragSource オブジェクトが自動的に生成されます。DragSource オブジェクトには、ドラッグ対象がオブジェクトにドロップされた場合にいつも取る動作を示すプロパティ (DragSource.drag-effect) があります。このプロパティの値は、コピー、移動、リンク、および何もしないという 4 つのドラッグ効果の 1 つです。ドラッグ対象がドロップ先の上にあるとき、既定では値は「移動」になります。ユーザーが CTRL キーを押している場合、値は「コピー」に変わります。
CTRL キーが押されたかどうかに基づいて、ドラッグ アンド ドロップ操作のドラッグ効果とドロップ結果の両方を指定することができます。DragEffect.has-effect? メソッドを使用して、このプロパティを DragOver および Drop を処理するために記述するプロシージャの基準にすることができます。デモンストレーションについては次の例を参照してください。

例: ドラッグ アンド ドロップ操作をコントロールするための CTRL キーの使用
{text Drop the circle on the box while holding down the {bold CTRL}
    key. Then drop the circle on the box without holding it down.}
{HBox
    valign = "center", width = 9cm,

    {EllipseGraphic || the dragee
        width = 1cm, height = 1cm, dragee = {ImageDragee}},

    {Fill width = {make-elastic preferred-size = 10cm}},

    {VBox  || the drop target
        width = 1.5cm, height = 1.5cm, border-width = 1pt,
        border-color = {FillPattern.get-black},
        opaque-to-events? = true,
        {on e:DragOver do
            {e.will-accept-drop?
                {proc
                    {a:Type,
                     b:Distance,
                     c:Distance,
                     d:#DragEffect
                    }:DragEffect

                    || This drop target returns one of two drag
                    || effects based on the state of the
                    || DropSource.  The call to
                    || DragEffect.has-effect? reveals this state.
                    || The DragEffect object is named "d" in the
                    || arguments to this procedure.  If the user
                    || has pressed CTRL, the state of the
                    || DropSource is "copy".
                    {if {d.has-effect? "copy"} then
                        {return drag-effect-copy}
                     else
                        {return drag-effect-move}
                    }
                }
            }
        },
        {on e:Drop at vb:VBox do
            {e.accept-drop
                {proc
                    {w:any,
                     x:Distance,
                     y:Distance,
                     z:#DragEffect
                    }:DropResult

                    || This drop target returns one of two drop
                    || results based on the Dragsource's state, as
                    || revealed by the call to
                    || DragEffect.has-effect?  The DragEffect is
                    || named "z" in the arguments to this
                    || procedure.  If the user has pressed CTRL,
                    || the state of the DropSource is "copy".
                    {if {z.has-effect? "copy"} then
                        {return
                            {DropResultCopy
                                action =
                                    {proc {}:void

                                        || In this case a copy of the
                                        || dragee (w) is added.
                                        {vb.add {w.clone-appearance}}
                                    }
                            }
                        }
                     else
                        {return
                            {DropResultMove
                                action =
                                    {proc {}:void

                                        || In this case the dragee (w)
                                        || itself is added.
                                        {vb.add w}
                                    }
} } } } } } } } 

その他のビジュアル キュー

DragEnter および DragLeave イベントを使用してドロップ先の外観を変更し、その目標にドロップできるものがあることをよりダイナミックに表示することができます。ポインタがドロップ先の境界を通過すると、これらのイベントがドロップ先で起動されます。
これらのイベントをより効果的に使用するには、イベントの DragEventInfo.dss フィールドを使用する必要があります。このフィールドには DataTransferSourceSet としてドラッグされているデータのセットが含まれます。
DataTransferSourceSet の各要素には DataTransferSource が含まれ、(複数フォーマットが利用できる場合でも) ドラッグ中の単一オブジェクトを表示します。DataTransferSourceSet.for-each を使用してデータオブジェクト全体を繰り返すことができます。
DataTransferSource.get-data-type を使用してドラッグ中のオブジェクトのデータ型を取得し、ドラッグが出入りしているときに変更するものがあるかどうかを判断することができます。
この例では、カーリング ゲームを取り上げてこの技術を説明します。カーリングでは、2 組の 4 人編成チームが重い石を一定の長さの氷面の一方端にある円の中心に向かって滑らします。次に示すゲームでは、選手が多数いて、それぞれが 4 つの異なる位置でプレイできます。選手をプレイする位置にドラッグすることができるだけです。選手を正しい位置にドラッグするとカーソルが変化し、その位置の背景色が変化します。
この例では次の点について注意します。

例: DragEnter および DragLeave の使用
|| curler-position-target creates a drop target for dropping a
|| CurlPlayer of a particular type.  It takes a position string,
|| which it displays, and a position-type, which is compared
|| against the type being dropped.
{define-class CurlerPositionTarget {inherits VBox}
  field position:String
  field position-type:Type

  || display holder for adding the name of the player.
  field name-holder:TextFlowBox

  {constructor {default
                   position:String,
                   position-type:Type
               }
    set self.position = position
    set self.position-type = position-type
    set self.name-holder = {TextFlowBox}

    || construct a VBox, which is the drop target.  Its contents
    || are the position name, a picture, and then the name-holder,
    || which will be modified when the drop occurs.

    {construct-super
        halign = "center",
        {bold {value position}},
        {image
            source = {url "../../default/images/curler3-transparent.gif"},
            width = 0.5in, height = 0.5in, blocking? = true
        },
        self.name-holder}}

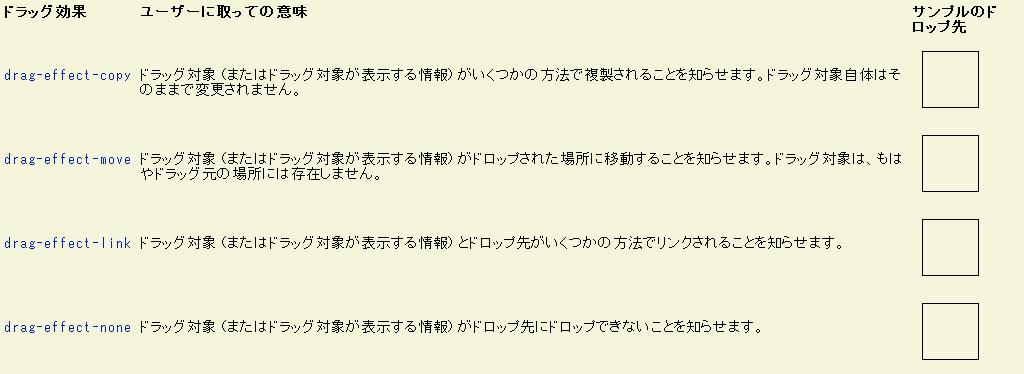
  || DragOver handler compares the type being dragged
  || to the type that we accept.
  {method public {on-drag-over e:DragOver}:void
    {e.will-accept-drop?
        {proc {t:Type, x:Distance,
               y:Distance, effect:#DragEffect}:DragEffect
            {if {self.right-player-type? t} then
                {return drag-effect-copy}
             else
                {return drag-effect-none}}
            {e.consume}
        }}}

  || Drop handler makes sure that the right type is dropped.  If
  || so, it adds the name in dragee to the display by changing the
  || contents of the name-holder.
  {method public {on-drop e:Drop}:void
    || Make sure to remove any background added by
    || the DragEnter handler
    {unset self.background}
    {e.accept-drop
        {proc {a:any, x:Distance,
               y:Distance, effect:#DragEffect}:DropResult
            {if {self.right-player-type? {type-of a}} then
                {return
                    {DropResultCopy
                        action = {proc {}:void
                                     let name-holder:TextFlowBox = self.name-holder
                                     {name-holder.clear}
                                     {name-holder.add a.player-name}
                                     {e.consume}
                                 }}}
             else
                {return {DropResultNone}}}
        }
    }
  }

  || DragEnter handler sets the background if we are over the
  || right type of object
  {method public {on-drag-enter e:DragEnter}:void
    let right-type?:bool = true
    {e.dss.for-each
        {proc {ds:DataTransferSource}:void
            {unless {self.right-player-type? {ds.get-data-type}}
             do set right-type? = false}}}
    {if right-type? then
        set self.background = "yellow"}
    {e.consume}
    {super.on-drag-enter e} || Call the superclass implementation
  }
  {method public {on-drag-leave e:DragLeave}:void
    {unset self.background}
    {e.consume}
    {super.on-drag-leave e} || Call the superclass implementation
  }
  {method private {right-player-type? t:Type}:bool
    {return (self.position-type == t)}
  }
}

|| CurlPlayer is an abstract class whose subclass can
|| be dropped on a curler-position-target.
{define-class abstract CurlPlayer {inherits VBox}
  || player name
  field player-name:String

  {constructor {default player-name:String}
    set self.player-name = player-name
    {construct-super
        {Frame
            {image
                source = {url "../../default/images/curler4-transparent.gif"},
                blocking? = true},
            width = 0.5in,
            height = 0.5in
        },
        player-name,
        border-width = 1pt,
        text-selectable? = false,
        || All you have to do to make it draggable
        dragee = {ImageDragee}
    }
  }
}

|| Derivations for skip, vice-skip, second, and lead.
{define-class CurlSkip {inherits CurlPlayer}
  {constructor {default player-name:String}
    {construct-super player-name}}}

{define-class CurlViceSkip {inherits CurlPlayer}
  {constructor {default player-name:String}
    {construct-super player-name}}}

{define-class CurlSecond {inherits CurlPlayer}
  {constructor {default player-name:String}
    {construct-super player-name}}}

{define-class CurlLead {inherits CurlPlayer}
  {constructor {default player-name:String}
    {construct-super player-name}}}

|| Main display code
{value
    || create a canvas on which to put the curler-position-target
    || objects.
    let c:Canvas = {Canvas
                       width = 2in,
                       height = 7in,
                       border-color = "black",
                       border-width = 1pt
                   }

    || background image is the curl playing surface.
    {c.add {image
               source = {url "../../default/images/sheetofice2.gif"},
               blocking? = true},
        x = .2in, y = 6.75in}

    || add the curler-position-targets for the positions.
    {c.add {CurlerPositionTarget "Skip", CurlSkip},
        x = 1in, y = 0.5in}
    {c.add {CurlerPositionTarget "Second", CurlSecond},
        x = 0.5in, y = 3in}
    {c.add {CurlerPositionTarget "Vice-Skip", CurlViceSkip},
        x = 1.4in, y = 3in}
    {c.add {CurlerPositionTarget "Lead", CurlLead},
        x = 1in, y = 6in}

    || Here's what gets displayed:
    {HBox
        valign = "top",
        || VBox contains instructions and players.
        {VBox
            spacing = 4pt,
            {TextFlowBox
                {bold { big Instructions}},
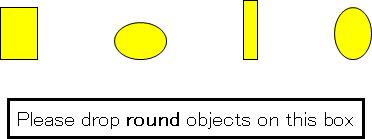
                {paragraph Drag player names from the left onto the appropriate
                    positions to play them at that position. }

            },
            {bold Leads},
            {RasterBox
                {CurlLead "Hemmings"},
                {CurlLead "Harstone"},
                {CurlLead "Schmirler"},
                {CurlLead "Harris"},
                {CurlLead "Richardson "},
                {CurlLead "Jones "}},
            {bold Skips},
            {RasterBox
                {CurlSkip "Werenich"},
                {CurlSkip "Gervais"},
                {CurlSkip "Mazinke"},
                {CurlSkip "Pickering "},
                {CurlSkip "Northcotte"}},
            {bold Vice-Skips},
            {RasterBox
                {CurlViceSkip "Richardson"},
                {CurlViceSkip "D'Amour"},
                {CurlViceSkip "Peterson"},
                {CurlViceSkip "Sanders"},
                {CurlViceSkip "Sparkes"},
                {CurlViceSkip "Tobin"}},
            {bold Seconds},
            {RasterBox
                {CurlSecond "Pezer"},
                {CurlSecond "Schoenhals"},
                {CurlSecond "Duguid"},
                {CurlSecond "Mckee"}
            }
        }, || VBox
        c  || instantiate the Canvas object
    } || HBox
} || main display code

ドラッグ対象のドロップ オフセットの使用

Drop.accept-dropx および y パラメータおよび Dragee.get-drop-offsets メソッドを使用して、ドロップされたオブジェクトをオブジェクトがドロップされた正確な場所に位置づける Drop ハンドラを作成することができます。ドラッグ アンド ドロップを使用してオブジェクトの位置を決めるアプリケーションの構築に使用できます。
次の例では、ドラッグ可能なフレームをキャンバス上の任意の場所にドロップしたり、ドロップされた場所に位置づけることができます。

例: ドラッグ対象のDrop オフセットの使用
|| SimpleEditableCanvas is a drop target
{define-class public SimpleEditableCanvas {inherits Canvas}
  {constructor {default ...}
    {construct-super ...}
  }

  {method public {on-drop e:Drop}:void
    {e.accept-drop
        {proc {a:any,
               x:Distance,
               y:Distance,
               effect:#DragEffect}:DropResult
            || Only support move
            {if {effect.has-effect? "move"} then
                {return {DropResultMove action =
                    {proc {}:void
                        || get the dragee option from
                        || the object being dropped
                        let dragee:Dragee = a.dragee
                        || compute the new position in the drop
                        || container
                        let (real-x:Distance, real-y:Distance) =
                            {dragee.get-drop-position x, y, self}
                        {self.add a, x = real-x, y = real-y}
                    }}}
             else
                {return {DropResultNone}}
            }
        }}
    {e.consume}
    {super.on-drop e}
  }

  {method public {on-drag-over e:DragOver}:void
    {e.will-accept-drop?
        {proc {t:Type,
               x:Distance,
               y:Distance,
               effect:#DragEffect}:DragEffect
            || only supports move
            {if {effect.has-effect? "move"} then
                {return drag-effect-move}
             else
                {return drag-effect-none}
            }
        }}
    {e.consume}
    {super.on-drag-over e}
  }
}

{value let simple-canvas =
    {SimpleEditableCanvas
        width = 3in,
        height = 2in,
        background = "beige"}
    let simple-canvas-obj =
        {Frame
            width = 0.5in,
            height = 0.25in,
            background = "blue",
            dragee = {ImageDragee}
        }
    {simple-canvas.add simple-canvas-obj, x = 1.5in, y = 1in}
    {value simple-canvas}
}

複数のオブジェクトのドラッグ

Graphic.drageeGraphic.graphic-selectable および selection-context と共に使用するときは、ドラッグ中のオブジェクトが現在選択されている場合、Graphic.dragee であるその他のすべての選択されているオブジェクトもドラッグされます。
次の例では、SimpleDraggableFrame という名前のクラスを定義します。キャンバス内のフレームを両方とも選択してドラッグする場合、両方のフレームはドラッグされ移動されます。両方のフレームを選択するには、CTRL キーを押したままもう一方のフレームを選択します。

例: 複数のオブジェクトのドラッグ
|| A frame that is both draggable and selectable
{define-class SimpleDraggableFrame {inherits Frame}
  {constructor {default ...}
    {construct-super.Frame
        dragee = {ImageDragee},
        background = "blue",
        graphic-selectable = {GraphicSelectable},
        ...
    }
  }
}

{define-class  SimpleEditableCanvas {inherits Canvas}
  {constructor {default ...}
    {construct-super ...}
  }

  {method public {on-drop e:Drop}:void
    {e.accept-drop
        {proc {a:any,
               x:Distance,
               y:Distance,
               effect:#DragEffect}:DropResult
            || Only support move
            {if {effect.has-effect? "move"} then
                {return {DropResultMove action =
                    {proc {}:void
                        || get the dragee option from
                        || the object being dropped
                        let dragee:Dragee = a.dragee
                        || compute the new position in the drop
                        || container
                        let (real-x:Distance, real-y:Distance) =
                            {dragee.get-drop-position x, y, self}
                        {self.add a, x = real-x, y = real-y}
                    }}
                }
             else
                {return {DropResultNone}}
            }
        }}
    {e.consume}
    {super.on-drop e}
  }

  {method public {on-drag-over e:DragOver}:void
    {e.will-accept-drop?
        {proc {t:Type,
               x:Distance,
               y:Distance,
               effect:#DragEffect}:DragEffect
            || only supports move
            {if {effect.has-effect? "move"} then
                {return drag-effect-move}
             else
                {return drag-effect-none}
            }
        }}
    {e.consume}
    {super.on-drag-over e}
  }
}

{value
    let simple-canvas:SimpleEditableCanvas =
        {SimpleEditableCanvas
            width = 3in,
            height = 2in,
            background = "beige"
        }

    {simple-canvas.add
        {SimpleDraggableFrame
            width = 0.5in,
            height = 0.25in},
        x = 1.5in,
        y = 1in
    }

    {simple-canvas.add
        {SimpleDraggableFrame
            width = 0.5in,
            height = 0.25in},
        x = 0in,
        y = 0in
    }

    {DiscreteGraphicSelectionFrame
        simple-canvas
    }
}

ファイルのドラッグ

ドラッグ アンド ドロップのメカニズムを使って Windows® Explorer にあるファイルを curl アプレットにドラッグすることができます。 ドロップターゲットに落とされたオブジェクトは Array-of Url となります。 各 Url はドラッグされたそれぞれのファイルと対応しています。
以下では、ファイルのドラッグを例証しています。 一つまたは複数のファイルを選択し、銀色の四角形の上にドロップします。 VBox はドロップを受け入れ、プロシージャの process-urls は対応するファイル名をボックス上に表示します。

例: ファイルのドラッグ アンド ドロップ
{define-proc {process-urls urls:{Array-of Url}}:void
    {vb.clear}
    {for url in urls do
        {vb.add url.filename}
    }
}
{let vb:VBox = 
    {VBox
        background = "silver",
        {Frame width = 2cm, height = 2cm}, ||give box initial size
        {on e:DragOver do 
            {e.will-accept-drop?
                {proc {type:Type, x:Distance, y:Distance,
                       effect:#DragEffect}:DragEffect
                    {return
                        {if type == {Array-of Url} then
                            drag-effect-copy
                         else
                            drag-effect-none
                        }
                    }
                }
            }
        }, 
        {on e:Drop do
            {e.accept-drop
                {proc {a:any, x:Distance, y:Distance,
                       effect:#DragEffect}:DropResult
                    {return
                        {DropResultCopy
                            action = {proc {}:void
                                         {type-switch a
                                          case urls:{Array-of Url} do
                                             {process-urls urls}
                                         }
                                     }
                        }
                    }
                }
            }
        }
    }
} 
{value  vb}