| 要約: | - Table クラスは、クラスのグラフィカルな子を表形式で配置する Grid のサブクラスです。
- Table クラスは柔軟性に富んでいます。このクラスは複雑なセル配置をサポートし、プログラムによる変更が可能です。
- グラフィカル オブジェクトをセル単位、行単位または列単位で表に追加することができます。
|
Table は
Grid のサブクラスです。グラフィカルな子を表形式で配置します。表に追加する各オブジェクトは、1 つ以上の
テーブル セルに関連付けられます。
さまざまな順序で表にセルを追加することができます。1 つのセルを複数の行または列に広げることができます。
table のテキスト プロシージャを使用すると、基本的な表を簡単に作成できます。プログラムを使用して表を変更する必要がない場合は、
table row および
cell を使用して行単位やセル単位で表をレイアウトすることができます。例については、「
表のテキスト書式」のセクションを参照してください。
Curl 言語では、表の作成方法が多数あります。表はプログラムによる変更が可能であることから、表の作成方法はほぼ無制限にあります。ただし、非常に簡単な表の作成方法もあります。
次の 3 つの例は、異なる方法で同じ表を作成しています。それらは次のとおりです。
- table
このテキスト プロシージャで行単位およびセル単位で表される表を作成します。これはスタティックな テーブルを作成する簡単な方法です。 - row-prototype
このプロシージャで行単位で表を作成します。同様のプロシージャ column-prototype では、列単位で表を作成します。この方法で表を作成すると Table オブジェクトが作成され、プログラムはこのクラスのメソッドにアクセスできるようになります。 - プログラムによる作成
次の 3 番目の例では、プロシージャが呼び出されると与えられたデータを配置して表を作成します。このプロシージャは、column-prototype を基にして Table.add メソッドを使用しています。
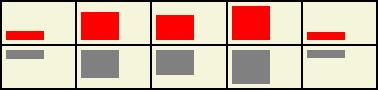
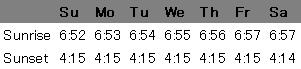
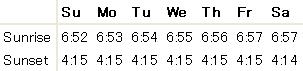
| 例:
table テキスト プロシージャで表を作成 |
 |
{table

    ||The first row is created with 'header-row'
    ||and 'header-cell'. This makes the text bold.

    {header-row
        background = "gray",
        {skip}
        {header-cell Su}
        {header-cell Mo}
        {header-cell Tu}
        {header-cell We}
        {header-cell Th}
        {header-cell Fr}
        {header-cell Sa}
    }

    ||The next two rows are created with 'row' and 'cell'.

    {row
        {cell Sunrise}
        {cell 6:52}
        {cell 6:53}
        {cell 6:54}
        {cell 6:55}
        {cell 6:56}
        {cell 6:57}
        {cell 6:57}
    }
    {row
        {cell Sunset}
        {cell 4:15}
        {cell 4:15}
        {cell 4:15}
        {cell 4:15}
        {cell 4:15}
        {cell 4:15}
        {cell 4:14}
    }
}
| |
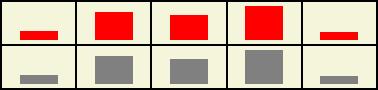
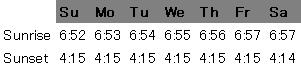
| 例:
row-prototype プロシージャで表を作成 |
 |
{Table

    ||Each row is created with 'row-prototype'.  This procedure can set options
    ||for the row.  It takes graphical objects (such as these strings) as its arguments.

    {row-prototype
        font-weight = "bold",
        background = "gray",
        {skip}, "Su", "Mo", "Tu", "We", "Th", "Fr", "Sa"
    },
    {row-prototype
        "Sunrise", "6:52", "6:53", "6:54", "6:55", "6:56", "6:57", "6:57"
    },
    {row-prototype
        "Sunset", "4:15", "4:15", "4:15", "4:15", "4:15", "4:15", "4:14"
    }
}
| |
| 例:
プログラムにより表を作成 |
 |
||Creates a Table object and assigns it to a variable

{let table:Table =
    {Table
        {column-prototype
            {skip}, "Sunrise", "Sunset"
        }
    }
}

||Defines a procedure 'column' that will take data, arrange it
||in a column, and add that column to the table.

{define-proc {column day:any, sr:String, ss:String}:void
    {table.add
        {column-prototype
            {cell
                background = "gray",
                font-weight = "bold",
                {value day}
            },
            sr,
            ss
        }
    }
}

||Display the table

{value table}

||Multiple calls to the procedure, 'column'.  Add another.

{column "Su", "6:52", "4:15"}
{column "Mo", "6:53", "4:15"}
{column "Tu", "6:54", "4:15"}
{column "We", "6:55", "4:15"}
{column "Th", "6:56", "4:15"}
{column "Fr", "6:57", "4:15"}
{column "Sa", "6:57", "4:14"}
| |
Table にグラフィカル オブジェクトを明示的に追加する方法には、セル単位、行単位または列単位があります。
グラフィカル オブジェクトの場合、
Table オブジェクトがグラフィカルな親となるグラフィック階層にオブジェクトを明示的に追加するには
Table.add メソッドを使用します。オブジェクトを追加するその他の方法としては、グラフィック階層をミラーリングする Curl 言語式の使用が挙げられます。
次の例で、オブジェクトを
Table に追加するさまざまな方法を示します。 これらの例で、
Table のいくつかの機能の概要に触れます。詳細については、後続のセクションを参照してください。
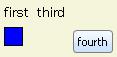
最初の例は、オブジェクトを
Table に直接追加します。Curl® Runtime は非グラフィカル オブジェクトをグラフィカル オブジェクトに自動的に変換し、
TableCell オブジェクトをインスタンス化して
TableCell オブジェクトを
Table に追加される各グラフィカル オブジェクトに関連付けます。
| 例:
表にオブジェクトを追加 |
 |
||Adding objects to three table cells
||on a cell-by-cell basis
{Table background="beige",
    "first",
    {RectangleGraphic fill-color="blue", width=0.5cm, height=0.5cm},
    {text third}
}
| |
次の例は、Table にオブジェクトを行単位で追加します。
| 例:
表に行を追加 |
 |
||Adding objects on a row-by-row basis
{Table background="beige",

    ||Row 0 has one object
    {row-prototype "first"},

    ||Row 1 has two objects
    {row-prototype {RectangleGraphic fill-color="blue",
                       width=0.5cm,
                       height=0.5cm},
        {text third}
    },

    ||Row 2 has one object
    {row-prototype {CommandButton label="fourth"}}
}
| |
| 例:
表にセルを追加 |
 |
|| Create Table with 2 columns
{Table columns=2,
    background="beige",

    ||Add objects on a cell-by-cell basis,
    ||specifying the cell location for each
    {cell-prototype "first", row=0, column=0},
    {cell-prototype {RectangleGraphic fill-color="blue",
                        width=0.5cm,
                        height=0.5cm}, row=0, column=1},
    {cell-prototype {text third}, row=1, column=1}
}
| |
セルの位置を空の状態にできることに特に留意してください。
| 例:
表に列を追加 |
 |
|| Create Table
{value
    let t:Table={Table background="beige"}

    ||Add objects on a column-by-column and cell-by-cell basis,
    ||by calling Table.add and specifying the cell location
    {t.add {column-prototype "first",
               {RectangleGraphic fill-color="blue",
                   width=0.5cm,
                   height=0.5cm}}}
    {t.add {column-prototype {text third}}}
    {t.add {CommandButton label="fourth"}, row=1, column=2}
    t
}
| |
Table は、
Grid なので、先に追加されたオブジェクトの上に後で追加されるオブジェクトをスタックして、オブジェクトの一部または全体を隠してしまうことができます。したがって、
Table に追加したオブジェクトを記録して、オブジェクトが配置されたテーブル セルを認識できることが大切になります。
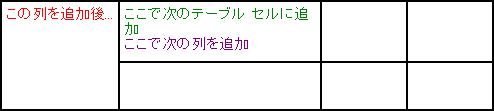
Table へのテーブル セルの追加は、テキスト エディタでドキュメントにテキストを追加するのに似ています。テキスト エディタでは、表示される挿入ポイントまたはカーソルがテキストの追加位置を示します。同様に
Table には挿入ポイントがあり、これは見えませんが次のルールに従って移動します。
テーブル セルの追加後
- 次に追加する要素でテーブル セルが一杯になる場合、内容が追加される前に挿入ポイントは次のテーブル セルの上部に移動します。
- 次に追加する要素で行が一杯になる場合は、内容が追加される前に挿入ポイントは次の行の最初のテーブル セルに移動します。
- 次に追加する内容で列が一杯になる場合は、追加される前に挿入ポイントは次の列の最初のテーブル セルに移動します。
行に追加後、
- 次に追加する内容でテーブル セルが一杯になる場合は、内容が追加される前に挿入ポイントは次の行の最初のテーブル セルに移動します。
- 次に追加する内容で行が一杯になる場合も、追加される前に挿入ポイントは次の行の最初のテーブル セルに移動します。
- 列を追加後、
- 次に追加する内容でテーブル セルが一杯になる場合は、追加される前に挿入ポイントは次の列の最初のテーブル セルに移動します。
- 次に追加する内容で列が一杯になる場合も、追加される前に挿入ポイントは次の列の最初のテーブル セルに移動します。
セルの内容を
Table に追加する際に、前のセクションで説明した既定の配置パターンを使用せずに、次のように
Table 内の位置を指定することができます。
これらは
Table 内の位置を指定するキーワード引数です。次に
Table 内のセルの位置を (
row,
column) で示します。
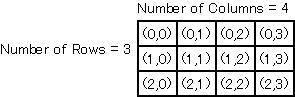
たとえば、次のコードで示すようにテーブル セル (0,2) と (2,1) の位置にオブジェクトを追加するように指定できます。追加するオブジェクトでテーブル セルの既存の内容が隠れることに注意してください。
| 例:
特定のテーブル セルにデータを追加 |
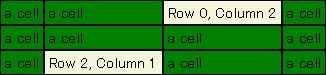 |
{Table cell-border-color="black",
    cell-border-width=1pt,
    background="green",
    columns=4,
    {cell-prototype "a cell"},
    {cell-prototype "a cell"},
    {cell-prototype "a cell"},
    {cell-prototype "a cell"},
    {cell-prototype "a cell"},
    {cell-prototype "a cell"},
    {cell-prototype "a cell"},
    {cell-prototype "a cell"},
    {cell-prototype "a cell"},
    {cell-prototype "a cell"},
    {cell-prototype "a cell"},
    {cell-prototype "a cell"},
    {cell-prototype row=0,
        column=2,
        background="beige",
        "Row 0, Column 2"},
    {cell-prototype row=2,
        column=1,
        background="beige",
        "Row 2, Column 1"}
} | |
特定のテーブル セルの指定に加え、追加するオブジェクトが一定数のテーブル セルに拡張して配置されるよう指定することもできます。この場合、水平方向の複数の列、または垂直方向に複数の行に拡張することができます。次のキーワードは
cell-prototype プロシージャで指定できます。
- colspan=int を指定すると、オブジェクトは指定数のテーブル セルにかけて水平方向に広がります。
- rowspan=int を指定すると、オブジェクトは指定数のテーブル セルにかけて垂直方向に広がります。
テーブル セルの追加時に挿入ポイントが移動する順序に留意してください。この順序は後で追加される各オブジェクトの位置に影響します。
次の例では、obj 3 は垂直方向に 2 つのテーブル セルに広がっていますが、この効果を完全に見ることができません。 それは、obj 7 が同じテーブル セルの 1 つに追加され、先に追加されたオブジェクトの上に表示されているからです。
| 例:
複数のテーブル セルに広がるオブジェクトの追加 |
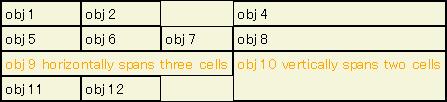 |
{Table cell-border-color="black",
    cell-border-width=1pt,
    border-color="black",
    border-width=1pt,
    background="beige",
    columns=4,
    {cell-prototype "obj 1"},
    {cell-prototype "obj 2"},
    {cell-prototype rowspan=2,  color="orange",
        "obj 3 vertically spans two cells"},
    {cell-prototype "obj 4"},
    {cell-prototype "obj 5"},
    {cell-prototype "obj 6"},
    {cell-prototype "obj 7"},
    {cell-prototype "obj 8"},
    {cell-prototype colspan=3,  color="orange",
        "obj 9 horizontally spans three cells"},
    {cell-prototype rowspan=2,  color="orange",
        "obj 10 vertically spans two cells"},
    {cell-prototype "obj 11"},
    {cell-prototype "obj 12"}
}
| |
ピクセルが隠蔽されないように、
skip プロシージャを使用して既に内容が含まれているテーブル セルの位置をスキップすることができます。
| 例:
skip プロシージャの使用 |
 |
{Table columns=4,
    border-color="black",
    border-width=1pt,
    cell-border-color="black",
    cell-border-width=1pt,
    background="beige",
    {cell-prototype "obj 1"},
    {cell-prototype "obj 2"},
    {cell-prototype rowspan=2, color="orange",
        "obj 3 vertically spans two cells"},
    {cell-prototype "obj 4"},
    {cell-prototype "obj 5"},
    {cell-prototype "obj 6"},
    ||skipping the cell previously occupied by obj 7"
    {skip},
    {cell-prototype "obj 8"},
    {cell-prototype colspan=3, color="orange",
        "obj 9 horizontally spans three cells"},
    {cell-prototype rowspan=2, color="orange",
        "obj 10 vertically spans two cells"},
    {cell-prototype "obj 11"},
    {cell-prototype "obj 12"}
}
| |
row-prototype プロシージャを使用すると、行単位でオブジェクトを
Table に追加します。行を追加する際の既定のルールについては、「
挿入ポイントの記録」で説明されています。ただし、特定の行を指定する場合、あるいは行を開始する特定のテーブル セルを指定する場合は、次のキーワード引数を使用します。
- row=int は、オブジェクトが追加される行のインデックスを指定します。
- column=int は、オブジェクトが追加される列のインデックスを指定します。
挿入ポイントの現在位置を確認し、
skip を呼び出して 1 つ以上のテーブル セルをスキップし、挿入ポイントを移動することができます。
skip の引数では、挿入ポイントがスキップするテーブル セルの数を指定します。既定数は 1 です。 「
挿入ポイントの記録」のセクションで説明されているように、挿入ポイントは前述の方向に移動します。
次の例で、
row-prototype および
column-prototype プロシージャで
row= および
column= を使用する方法を示しています。
color="green" が行全体に適用されることに注意してください。同様に、
color="purple" は列全体に適用されます。
| 例:
表の特定の行にデータを追加 |
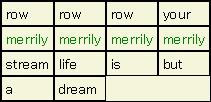 |
{Table columns=4,
    border-color="black",
    border-width=1pt,
    cell-border-color="black",
    cell-border-width=1pt,
    background="beige",
    "row",
    "row",
    "row",
    "your",
    "boat",
    "gently",
    "down",
    "the",
    "stream",
    {row-prototype row=1,
        color="green",
        "merrily",
        "merrily",
        "merrily",
        "merrily"},
    || skip stream
    {skip},
    "life",
    "is",
    "but",
    "a",
    "dream"
}
| |
| 例:
特定の列にデータを追加 |
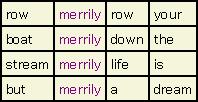 |
{Table columns=4,
    border-color="black",
    border-width=1pt,
    cell-border-color="black",
    cell-border-width=1pt,
    background="beige",
    "row",
    "row",
    "row",
    "your",
    "boat",
    "gently",
    "down",
    "the",
    "stream",
    {column-prototype column=1,
        color="purple",
        "merrily",
        "merrily",
        "merrily",
        "merrily"},
    || reposition insertion point
    || after third merrily
    {cell-prototype row=2, column=2,
        "life"},
    "is",
    "but",
    || skip the last merrily
    {skip},
    "a",
    "dream"
} | |
- valign : 次のいずれかの方法を使用してテーブル セルの内容を水平方向に揃えます。
- "top"上端に揃えます。
- "center" 中心に揃えます。
- "bottom" 下端に揃えます。
- "origin" 外側起点の垂直コンポーネントに揃えます (既定)。
- [0, 1] の範囲内の値で、上端から下端までの距離に比例する位置で揃えます。
- halign : 次のいずれかの方法を使用してテーブル セルの内容を垂直方向に揃えます。
- "left"左端に揃えます。
- "center" 中心に揃えます。
- "right" 右端に揃えます。
- "origin" 外側起点の水平コンポーネントに揃えます (既定)。
- [0, 1] の範囲内の値で、左端から右端までの距離に比例する位置で揃えます。
次の例では、行 0 は次の式で作成されています。 {row-prototype halign="center", ...}
次の例では、行 0 は次の式で作成されています。 {row-prototype valign="bottom", ...}
次の例では、
Table は次の式で作成されています。
{Table valign="bottom", halign="center", ...}
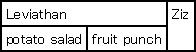
skip プロシージャを使用して、表の 1 つ以上のセルを空の状態にします。次の例では
skip の使用法を示しています。
skip の使用によるボーダーの外観の変化に注意してください。
| 例:
skip プロシージャの使用 |
 |
{table
    border-width = 1pt,
    border-color = "black",
    cell-border-width = 1pt,
    cell-border-color = "black",
    {row
        {cell Leviathan} {cell Behemoth} {cell Ziz}
    }

    || The {skip} in the following row takes the place of one cell.

    {row
        {cell potato salad} {skip} {cell watermelon}
    }
}

{table
    border-width = 1pt,
    border-color = "black",
    cell-border-width = 1pt,
    cell-border-color = "black",

    || The {skip} in the following row takes the place of two cells.

    {row
        {skip 2} {cell Ziz}
    }
    {row
        {cell potato salad} {cell fruit punch} {cell watermelon}
    }
}

{table
    border-width = 1pt,
    border-color = "black",
    cell-border-width = 1pt,
    cell-border-color = "black",
    {row
        {cell Leviathan} {cell Behemoth} {cell Ziz}
    }

    || The middle cell in the following row contains one non-breaking
    || space.  The space is not collapsed because it is escaped
    || by the \ character.  Notice how this affects the border.

    {row
        {cell potato salad} {cell \ } {cell watermelon}
    }
}
| |
skip を rowspan または colspan のいずれかと共に使用して、1 つのテーブル セルが 2 つ以上のスペースを確保するようにします。このようにして 2 つのテーブル セルを結合できます。次の例では、skip、rowspan および colspan の使用法を示します。
| 例:
rowspan および colspan を使用してテーブル セルを結合 |
 |
{table
    border-width = 1pt,
    border-color = "black",
    cell-border-width = 1pt,
    cell-border-color = "black",

    || The first cell in the following row takes up the width of
    || two cells.  Notice that the second cell is replaced by a {skip}.

    || The third cell in the following row takes up the height of
    || two cells.  Notice that the third cell in the lower row
    || is replaced by a {skip}.

    {row
        {cell colspan = 2, Leviathan} {skip} {cell rowspan = 2, Ziz}
    }
    {row
    {cell potato salad} {cell fruit punch} {skip}
    }
}
| |
次のリストでは、いくつかのテーブル セル オプションを説明しています。
次の例では、表の対角線 (左上から右下) に沿ったセルにさまざまなボーダーおよびマージンのオプションが追加されています。左上のセルはテーブルからボーダーの幅および色を継承し、1mm の既定のマージンおよび "none" のボーダー スタイルが適用されています。マージンの値およびボーダー スタイルを変更してみてください。
| 例:
テーブル セルにオプションを設定 |
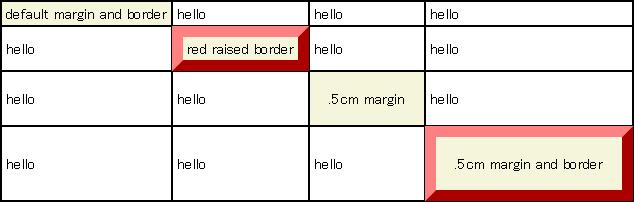 |
{Table columns=4,
    border-color="black",
    border-width=1pt,
    cell-border-color="black",
    cell-border-width=1pt,
    {row-prototype "hello", "hello", "hello", "hello"},
    {row-prototype "hello", "hello", "hello", "hello"},
    {row-prototype "hello", "hello", "hello", "hello"},
    {row-prototype "hello", "hello", "hello", "hello"},
    || uses default margin (1mm) and default border style (none)
    {cell-prototype row=0, column=0,
        background="beige",
        "default margin and border"},
    || has border
    {cell-prototype row=1, column=1,
        cell-border-width=8pt,
        cell-border-color="red",
        cell-border-style="raised",
        background="beige",
        "red raised border"},
    || has non-default margin
    {cell-prototype row=2, column=2,
        cell-margin=0.5cm,
        background="beige",
        ".5cm margin"},
    || has both non-default margin and border
    {cell-prototype row=3, column=3,
        cell-border-width=8pt,
        cell-border-color="red",
        cell-border-style="raised",
        cell-margin=0.5cm,
        background="beige",
        ".5cm margin and border"}
}
| |
次の例では、テーブルの
cell-border-spec プロパティの設定に
BorderSpec を使用しています。結果のテーブル セルのボーダーとマージンに注意してください。
| 例:
テーブル セルで BorderSpec を使用する |
 |
{let bspec:BorderSpec =
    {BorderSpec
        top-border-width = 0.5cm,
        right-border-width = 0.5cm,
        left-margin = 0.5cm,
        bottom-margin = 0.5cm
    }
}
{let t:Table =
    {Table
        border-width = .1cm,
        border-color = "#cccccc",
        cell-border-width = .1cm,
        cell-border-color = "red",
        cell-border-style = "raised",
        cell-border-spec = bspec
    }
}
{for r:int = 0 below 3 do
    {for c:int = 0 below 3 do
        let g:Graphic =
            {t.add {format "Row %2d, Col %2d", r, c}, row = r, column = c}
    }
}
{value t}
| |
テーブル セルのオプション バインディングは、セル、行、列および表レベルで設定することができます。セルレベルのバインディングは、行または列レベルのバインディングよりも優先されます。行および列の両方にオプションが設定される場合、最後に設定されたバインディングが優先されます。表レベルのバインディングは優先順位が一番低くなります。
次の例では、さまざまなレベルで複数回設定されたオプション バインディングの優先順位を示します。次の点に着目してください。
- テキスト "cell" が表示されたテーブル セル (0, 2) は、セルレベルのバインディングが表レベルのバインディング設定 "red" より優先されるため、ボーダー色が黄色になっています。
- テキスト "column" が表示されたテーブル セル (1, 1) は、列レベルのバインディイングが行レベルのバインディング設定 "blue" の後に実行されたため、ボーダー色が緑色になっています。
- テキスト "row" が表示されたテーブル セル (1, 0)、(1, 2) および (1, 3) は、行レベルのバインディングが表レベルのバインディング設定 "red" より優先されるため、ボーダー色は青色になっています。
- テキスト "column" が表示されたテーブル セル (2, 1) は、行レベルのバインディングがなく、列レベルのバインディング設定 "green" が表レベルのバインディング設定 "red" より優先されるため、ボーダー色は緑色になっています。
| 例:
表の行および列にオプションを設定 |
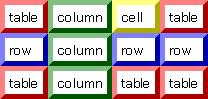 |
{Table || setting options by table
    cell-border-width=4pt,
    cell-border-color="red",
    cell-border-style="raised",
    || row 0
    {row-prototype "table", "table", "table", "table"},
    || row 1
    {row-prototype "table", "table", "table", "table"},
    || row 2
    {row-prototype "table", "table", "table", "table"},
    || cell 0, 2: setting options by cell, within a table
    {cell-prototype row = 0, column = 2,
        cell-border-color="yellow",
        "cell"},
    || row 1: setting options by row, within a table
    {row-prototype row = 1,
        cell-border-color="blue",
        "row", "row","row","row"},
    || col 1: setting options by column, within a table
    {column-prototype column=1,
        cell-border-color="green",
        "column", "column", "column"}
} | |
他のグラフィカル オブジェクトと同様に、オブジェクトを
Table に追加するときだけオプションを設定できるという制限はありません。次の構文を使用してセルのオプションを設定することができます。
テーブル セルのオプションを設定する場合、上記の構文は表にあるテーブル セルすべてのオプション バインディングを実行します。ところが、このようなバインディングを適用したくない場合があります。オブジェクトを追加する際のオプション バインディング設定と同様に、オブジェクトを追加した後のオプション バインディングも次の方法で設定することができます。
したがって、特定のセルにオプション バインディングを設定するには、次の構文を使用します。
set TableCell-obj.option = value
テーブル セルを含む行にオプション バインディングを設定するには、次の構文を使用します。
set TableRow-obj.option = value
テーブル セルを含む列にオプション バインディングを設定するには、次の構文を使用します。
set TableColumn-obj.option = value
次のメソッドにより必要なオブジェクトを取得することができます。
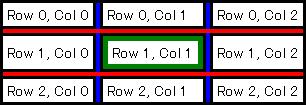
| 例:
表の初期化後にオプションを変更 |
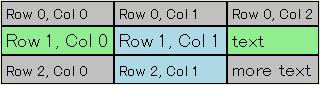 |
{value
    let g:Graphic="text"
    let g1:Graphic="more text"
    let t:Table =
        {Table columns=3,
            border-width=1pt,
            cell-border-color="black",
            cell-border-width=1px
        }

    {for i:int=0 to 2 do
        {for j:int=0 to 2 do
            {t.add {text Row {value i}, Col {value j}}}
        }
    }
    {t.add row=1, column=2, g}
    {t.add row=2, column=2, g1}
    set {t.get-element-row g1}.background = "silver"
    set {t.get-row 1}.background = "lightgreen"
    set {t.get-column 1}.background = "lightblue"
    set {t.get-row 0}.background = {t.get-element-row g1}.background
    set {t.get-row 1}.font-size = 14pt
    set {t.get-element-cell g1}.font-size = {t.get-element-cell g}.font-size
    t
}
| |
Table と他の
Box の違いは、
Table には行、列、セルの豊富な内部構造が存在する点です。各オプションがこの構造を利用できるように、
Table では特別なオプションの検索ルールを実装しています。
オプション (ローカルまたは非ローカル) を
Table 全体に設定した場合、
Table の行、列、セルの同じオプションを異なる設定でシャドウしない限り、
Table 内のすべてのセルに反映されます。オプションを
TableColumn または
TableRow に設定した場合、セルの左上隅が該当する列または行に含まれればこのようなセルすべてに適用されます (シャドウされる場合を除く)。オプションを
TableCell に設定した場合、そのセルにのみ適用されます。
TableRow に 1 つのオプション値を設定し、
TableColumn に別の値を設定した場合、この行と列の交点にあるテーブル セルではどちらの値が適用されるのかという問題が発生します。この場合に適用されるルールによると、この 2 つのオプション値で最後に設定された方が有効になります。
テーブル セル オプション セクションに、テーブル セルの外観を制御するオプションについて説明されています。
Table クラスにはテーブルの外観を制御する多くの追加のオプションを提供します。
セル ボーダーはすべてのセルに対するボーダー、またはセル単位でのボーダーを指定します。内部ボーダーにより、行、列、またはその両方のボーダーを指定できます。内部ボーダーはテーブルの行または列をグループ化し、グループ間のボーダーを描画する必要がある場合に特に有用です。
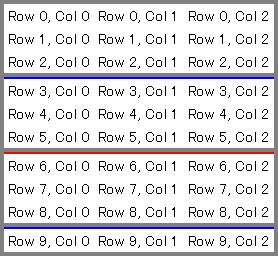
次の例はテーブル行間の内部ボーダーを示します。
| 例:
行を定義する internal-borders の使用 |
 |
{let t:Table =
    {Table
        internal-borders = "rows"
    }
}
{for r:int = 0 below 3 do
    {for c:int = 0 below 3 do
        let g:Graphic =
            {t.add
                {format "Row %2d, Col %2d", r, c}, row = r, column = c
            }
    }
}
{value t }
| |
この例はテーブル列間の内部ボーダーを示します。この場合、
border-width に対して設定された値によりテーブル全体の周りにボーダーが追加されます。
| 例:
行を定義する internal-borders の使用 |
 |
{let t:Table =
    {Table
        border-width = 1px,
        internal-borders = "columns"
    }
}
{for r:int = 0 below 3 do
    {for c:int = 0 below 3 do
        let g:Graphic =
            {t.add
                {format "Row %2d, Col %2d", r, c}, row = r, column = c
            }
    }
}
{value t}
| |
| 例:
事前定義されたテーブル グループの使用 |
 |
{let t:Table =
    {Table
        internal-borders = "groups",
        {row-prototype
            font-weight = "bold",
            {skip}, "Su", "Mo", "Tu", "We", "Th", "Fr", "Sa"
        },
        {row-prototype
            "Sunrise", "6:52", "6:53", "6:54", "6:55", "6:56", "6:57", "6:57"
        },
        {row-prototype
            "Sunset", "4:15", "4:15", "4:15", "4:15", "4:15", "4:15", "4:14"
        }
    }
}
{set {t.get-column 0}.group = TableGroup.header}
{set {t.get-row 0}.group = TableGroup.footer}
{value t}
| |
次の例は internal-borders を使用して、3 つのテーブル行の各グループの下に内部ボーダーを描画します。それは 2 つのグループ、tg1 と tg2 を定義し、3 つのグループの代わりにどちらかにテーブル行を割り当てます。
この例は internal-border が、実際に、各行の端またはボーダーの隣の列に描画された 2 つの線により構成されていることも示しています。この例では、ボーダー上の行の下部の線は、border-color (灰色) とテーブルの border-width (4px) セットを使用して描画します。ボーダーより下の行の上部の線は、border-color と新しいグループの最初の行の border-width セットを使用して描画します。
| 例:
TableGroup の定義 |
 |
{value
    let t:Table =
        {Table
            border-width = 4px,
            border-color = "gray",
            internal-borders = "groups"
        }
    let tg1:TableGroup = {TableGroup}
    let tg2:TableGroup = {TableGroup}
    let current-tg:TableGroup = tg1
    let switch:int = 0
    let group-size:int = 3
    {for r:int = 0 below 10 do
        {for c:int = 0 below 3 do
            let g:Graphic =
                {t.add
                    {format "Row %2d, Col %2d", r, c}, row = r, column = c
                }
            {if r == switch then
                {if current-tg == tg1 then
                    set current-tg = tg2
                    set {t.get-row r}.border-width = 2px
                    set {t.get-row r}.border-color = "red"
                 else
                    set current-tg = tg1
                    set {t.get-row r}.border-width = 2px
                    set {t.get-row r}.border-color = "blue"
                }
                set switch = switch + group-size
            }
            {t.group-rows current-tg, r}
        }
    }
    t
}
| |
追加の
Table プロパティにより、テーブルの行と列の間に線を描画することができます。これらには以下のプロパティが含まれます。
次の例はテーブルの水平および垂直線を示します。これらは単一の線なので、行と列の間に 1 ピクセルの線を簡単に描画するために使用できます。
| 例:
水平線および垂直線 |
 |
{value
    let t:Table =
        {Table
            horizontal-line-color = "red",
            horizontal-line-width = 1px,
            vertical-line-color = "blue",
            vertical-line-width = 1px
        }
    {for r:int = 0 below 3 do
        {for c:int = 0 below 4 do
            let g:Graphic =
                {t.add
                    {format "Row %2d, Col %2d", r, c}, row = r, column = c
                }
        }
    }
    t
}
| |
次の例は内部ボーダーおよびセル ボーダーで使用される水平線および垂直線を示します。線は内部ボーダーを構成する最後と最初の線の間に描画されることに注意してください。セル ボーダーは内部ボーダーの内側に描画されます。
| 例:
線とボーダーを共に使用 |
 |
{value
    let t:Table =
        {Table
            border-width = 3px,
            border-color = "black",
            internal-borders = "all",
            vertical-line-color = "blue",
            vertical-line-width = 4px,
            horizontal-line-color = "red",
            horizontal-line-width = 4px
        }
    {for r:int = 0 below 3 do
        {for c:int = 0 below 3 do
            let g:Graphic =
                {t.add
                    {format "Row %2d, Col %2d", r, c}, row = r, column = c
                }
            {if r == 1 and c == 1 then
                let ele:Graphic = {t.get-element r, c}
                let cell:TableCell = {t.get-element-cell ele}
                set cell.cell-border-width = 5px
                set {t.get-element-cell {t.get-element r, c}}.cell-border-color = "green"
            }
        }
    }
    t
}
| |
Copyright © 1998-2019 SCSK Corporation.
All rights reserved.
Curl, the Curl logo, Surge, and the Surge logo are trademarks of SCSK Corporation.
that are registered in the United States. Surge
Lab, the Surge Lab logo, and the Surge Lab Visual Layout Editor (VLE)
logo are trademarks of SCSK Corporation.